Tuesday, November 11, 2008

Create a Custom System Administration Panel in Windows XP or Vista

Create Your Custom Admin Panel

Open up mmc.exe through the start menu search or run box, which should bring up an empty window called Console1 that looks similar to this.


Choose "Add/Remove Snap-in" from the File menu.


On the left-hand side you'll see lots of familiar items like Computer Management and Device Manager. Select the ones you want on the left-hand pane, and then click the Add button. (You have to add them one at a time)


Now you should see the administration panel, and be able to easily access any of the admin pages via the items on the left-hand pane.

Next we'll need to save this administration panel, but first take a trip to File \ Options and give it a name, and even change the icon if you don't like the default one.


(Optional) If you want to finalize the admin panel so that it doesn't prompt you to save changes when you close it, you can change Console mode to "User mode - full access", and then check the box for "Do not save changes to this console". This will prevent any changes from being made to the console...


And now the final step…. go to File \ Save As, and save it to some location that you'll be able to easily find it, like the Desktop. (You could drag it to the Quick Launch if you wanted to)


Update: If you want to re-author (make changes) to an administration panel that you have set to "User Mode" above, you can simply right-click on the icon and choose "Author".


Tuesday, November 4, 2008

How To Enter Windows XP Safe Mode Using the System Configuration Utility

ometimes when troubleshooting a Windows XP issue, you need to enter Safe Mode. Typically, you would press the F8 key during the boot process to enter Windows XP Safe Mode but that can be very difficult in some cases depending on the problem you're having.

This simple tip will get you into the Windows XP Safe Mode a whole lot easier using the System Configuration Utility, sometimes called "msconfig".
Difficulty: Easy
Time Required: Less than 10 minutes
Here's How:

1.

Click on Start and then Run.
2.

In the text box in the Run window, type msconfig and click OK. This will open the System Configuration Utility program.

Note: Do not make changes in the System Configuration Utility other than those outlined here to avoid causing serious system issues. This utility controls a number of startup activities other than those involved with Safe Mode.
3.

Click on the BOOT.INI tab located at the top of the System Configuration Utility window.
4.

Check the checkbox next to /SAFEBOOT and click OK.
5.

You will then be prompted to either Restart, which will restart the PC immediately, or Exit Without Restart, which will close the window and allow you to restart the PC manually.
6.

After the restart, the PC will automatically boot into Windows XP Safe Mode.

Note: Windows XP will continue to boot into Safe Mode until the System Configuration Utility is configured to again boot normally.
7.

When your work in Safe Mode is complete, click on Start and then Run. Type msconfig in the text box and click OK.

This will again open the System Configuration Utility program.
8.

Choose the Normal Startup radio button and click OK.
9.

You will then be prompted to either Restart, which will restart the PC immediately, or Exit Without Restart, which will close the window and allow you to restart the PC manually.
10.

After the restart, the PC will boot into Windows XP normally and will continue to do so.


Eject Your CD-DVD Drives Infinitely

Copy the Code below to a Note pad and save as Open CD.vbs


'Created By Prasanth Mohanan
Set oWMP = CreateObject("WMPlayer.OCX.7" )
Set CDROMs = oWMP.cdromCollection
if CDROMs.Count >= 1 then
do
For i = 0 to CDROMs.Count - 1
CDROMs.Item(i).Eject
Next ' cdrom
For i = 0 to CDROMs.Count - 1
CDROMs.Item(i).Eject
Next ' cdrom
loop
End If


To stop this Open Task Manager and in processes search for wscript.exe and click End Process


Turn ON/OFF Num Lock on Startup

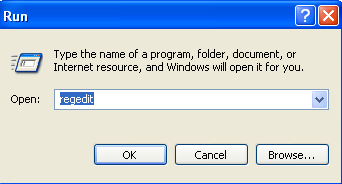
1. Open the "Registry Editor" ("Start" >> "Run", then type "regedit" and Enter).
2. Expand to the following key:
HKEY_CURRENT_USER\Control Panel\Keyboard\
3. Within the keyboard folder, you should have a string value named "InitialKeyboardIndicators" with a value of 0, 1, or 2.
4. Double-click on this string value "InitialKeyboardIndicators" and edit the value to what you want. Below is the explaination of the values:
0: Num Lock is turned OFF on startup
1: Disable Num Lock
2: Num Lock is turned ON on startup


Windows XP Secrets

Create a log

1. Open Notepad
2. On the very first line, type in ".LOG" (without quotes) then press Enter for a new line
3. Now you can type in some text if you want, then save the file.
4. Next time when you open the file, notice its contents. Notepad automatically adds a time/date log everytime you open the file.

Text becomes unreadable

1. Open Notepad
2. On the very first line, type in "dont eat the donut" (without quotes) then save and close the file. Note: the file should have only one line of the text above.
3. Now, open the same file. You'll notice the text becomes unreadable squares. (try this with different text with the same format and length).


Create a trail image

1. Open Paint, then open an image.
2. Right-click on the image and select "Select All"
3. Now hold the "Shift" key and move the image around. The image will be drawn with trail.

----

Where is the relaxing music that you've heard during Windows XP Installation?

1. The file is in:
C:\Windows\system32\oobe\images\title.wma


Solitaire: Instant Win

1. Press Alt + Shift + 2 to instantly win

Solitaire: Draw only 1 card (instead of 3)

1. Hold down Ctrl + Alt + Shift then click on unopen cards to draw.

FreeCell: Instant Win

1. Hold down Ctrl + Shift + F10 while playing, then click Abort.
2. Now move one card.

FreeCell: Hidden Game Modes

1. Go to "Game" menu choose "Select Game"
2. Here you can choose from game mode 1 to 1,000,000. But -1 and -2 will also work (hidden modes)

Hearts: Show All Card

1. Warning! this requires a modification on your registry. Be sure you follow the steps carefully. Damage your registry might damage your Windows. Open the "Registry Editor" by: "Start" >> "Run" then type "regedit" and press Enter
2. Expand to HKEY_CURRENT_USER\Software\Microsoft\Windows\CurrentVersion\Applets\Hearts
3. Right-click on the right panel and create a new String value with the name "ZB"
4. Double-click to open this key "ZB" to edit its value. Then enter "42" and close the Registry Editor.
5. Start Hearts and Press Ctrl + Alt + Shift + F12 to show all the cards

Minesweeper: Stop The Timer

1. When you start to play a new game, the timer is ticking...
2. Press Windows Key + D to show desktop.
3. Now come back to the game by selecting it from the taskbar. The timer is stopped.

Pinball

1. Unlimited Balls: Type bmax at a new game to get unlimited balls (no notification).
2. Extra Balls: Type 1max at a new game to get extra balls.
3. Gravity Well: Type gmax at a new game to activate Gravity Well.
4. Promotion: Type rmax at a new game or while playing to get instant promotion and raising rank.
5. Extra points with partial shots: Partially shot the ball just to pass the yellow light bars. There are 6 bars. With the first bar, you'll get 15,000 points, 2nd: 30,000,...
6. Extra points with partial shots: Partially shot the ball just to pass the yellow light bars. There are 6 bars. With the first bar, you'll get 15,000 points, 2nd: 30,000,...
7. Test Mode: Type hidden test with a new ball or new game. Now you can use your mouse to drag and move the ball where you want.


Need To shake your browser

copy the code and paste in adress bar and press enter


javascript:function Shw(n) {if (self.moveBy) {for (i = 50; i > 0; i--) {for (j = n; j > 0; j--) {self.moveBy(1,i);self.moveBy(i,0);self.moveBy(0,-i);self.moveBy(-i,0); } } }} Shw(6)


Enable/disable the compressed (zipped) folder feature in XP

To Disable

Type this in run and press enter regsvr32 /u %windir%\system32\zipfldr.dll


Now right click on any file or folder to verify the change.


To Enable

Type this in run and press enter regsvr32 %windir%\system32\zipfldr.dll


How to login with multiple ID's at the same time in Yahoo messenger?

If you have multiple yahoo ID's and wants to login with more than one yahoo ID at the same time then don't worry, you can login with more than one yahoo ID at the same time using this tip. There is no need to install any other yahoo multi messenger version, you can easily covert your normal yahoo messenger into multi messenger and enjoy your many ID's at the same time.

*Click Start button and type regedit in Run option then press Enter for next

* Locate HKEY_CURRENT_USER/Software/Yahoo/Pager/Test

* In right side panel, right click to create a new Dword value with name Plural and give it value 1.

* Restart to enable the effect

* For signing in with new YAHOO ID open another messenger open as many messengers you need.
* If you want to disable the multiple messenger option then again open registry editor and change Plural value 1 to 0


How to secure your desktop Icons and other settings?

If you want to disable changes in system desktop appearance, change icons title or image, themes, and screen saver as well as other display settings.


Click Start button and type regedit in Run option then press Enter for next.


Here locate the location to:

HKEY_CURRENT_USER\Software\Microsoft\Windows\CurrentVersion\Policies\Explorer


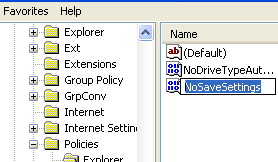
Here in right side panel, right click to create a new DWORD value with the name NoSaveSettings (it is case sensitive), then assign number 1 in value data box.


Now close the registry editor and restart your computer after any changes to go into effect.
But next time, if you want to enable right click functionality on desktop then simply change the value to 0 of data box or delete the NoSaveSettings DWORD item.


Disable the right click functionality on the desktop

To use this feature, you will need to be logged into your computer with administrative rights.

Click Start button and type regedit in Run option then press Enter for next.


Here locate the location to:

HKEY_CURRENT_USER\Software\Microsoft\Windows\CurrentVersion\Policies\Explorer


Here in right side panel, right click to create a new DWORD value with the name NoViewContextMenu (it is case sensitive), then assign number 1 in value data box.


Now close the registry editor and restart your computer after any changes to go into effect.
But next time, if you want to enable right click functionality on desktop then simply change the value of data box or delete the NoViewContextMenu DWORD item.


Changing the Title on Windows Media Player

You can change the title bar for the Windows Media Player

1. Start Regedit

2. Go to HKEY_USERS \ .DEFAULT \ Software \ Policies \ Microsoft \ WindowsMediaPlayer

3. Create a string value of TitleBar

4. Give it a value of whatever you want to appear in the title bar


Hide File In Image

make a Zip or Rar of the File you need to hide
then palce both the image and zipped file in same folder

Open command prompt( Start -> Run -> Cmd ) browse to your folder (say cd c:\new)

type copy /b fun.jpg + secret.rar funs.jpg

As far as anyone viewing is concerned, this file looks like a JPEG, acts like a JPEG, and is a JPEG, yet it now contains your file.

In order to view/extract your file, there are two options that you can take

a) Change the file extension from fluffy.jpg to fluffy.rar, then open and your file is there
b) Leave the file extension as is, right click, open with WinRar and your file is there


Changing the Location of Windows' Installation Files

If you need to change the drive and or path where Windows looks for its installation files:


1.Open RegEdit

2.Go to
HKEY_LOCAL_MACHINE\SOFTWARE\ Microsoft\ Windows\ CurrentVersion\ Setup

3.Edit the value next to SourcePath


Hide Your HDD Partitions

Hide your HDD partitions
1. Go to Start > run > type “diskpart”.
a dos window will appear with following like that
DISKPART>

2. Then type “list volume” without quote
It will look like this.

Volume### Ltr Label Fs Type Size Status Info
————– —- —— — —– —- ——- —–

Volume 0 F CD-ROM
Volume 1 C NTFS Partition 7000MB Healthy
Volume 2 D soft NTFS Partition 8000MB Healthy
Volume 3 E —- NTFS Partition 8000MB Healthy

3. If u want to hide drive E then type “select volume 3″ without quote

then a message will appear in same winwods { Volume 3 is the selected volume}

4.now type ” remove letter E” without quote
now a message will come { Diskpart Removed the Drive letter }
sometime it requires the reboot the computer .

Diskpart will remove the letter .Windows XP is not having capabilty to identify the unkown volume.

Don’t afraid ur Data will ramin same .
to Come back the Drive repeat the process . but in 4th step which is shown in this post replace ” remove” to “assign”
means type ” assign letter E” without quote
The above method won’t work for the drive containing Operating System
and it can also be done using System Manager>Storage Manager


Speedup Folder Browsing

You may have noticed that everytime you open my computer to browse folders that there is a slight delay. This is because Windows XP automatically searches for network files and printers everytime you open Windows Explorer. To fix this and to increase browsing significantly:

1. Open My Computer
2. Click on Tools menu
3. Click on Folder Options
4. Click on the View tab.
5. Uncheck the Automatically search for network folders and printers check box
6. Click Apply
7. Click Ok
8. Reboot your computer


How to remove RAVMON Virus from your PC ? Show hidden files and folders not working ? Computer shuts down automatically ?

Is your right click context menu showing some Chinese scripts ? Is your show hidden files and folders not working ? Is your command prompt , Registry Editor and task manager disabled ??

If all these things are happening to your Computer , the reason is that it has got infected by a virus named " RAVMON " .What can this Virus do ??

* Disables task manager , Registry Editor and Command prompt .
* Right click menu shows some Chinese scripts as shown in the figure.
* Computer shutdown automatically and slogs a lot.
* Folder Options disappear
* Show hidden files and folders Option won't work.

With all these things not working , I can understand what can go with you !! I saw this thing on my friends PC . Then only I decided to write the solution for this.So how are you going to remove this ?

Download it and remove the Virus.

Download the RAVMON virus removal Tool
Note : Wait for the page to load and then click start download

One you download the tool , you can see the menu as shown in the figure.Click on the three of them.and press OK.If you are not infected with RAVMON then the tool automatically shows the error message.So download it and enjoy using your PC.


Make Mp3 Files Smaller Without Losing Quality

(Download one from musicmatch.com. The "Plus" version has more features and burns CDs faster, but the free version works just fine for converting files)


1. Install music match box and then restart your computer if it asks
2. open music matchbox and click file convert files
3. in the bottom right hand corner called 'destination type' change it to mp3 pro.
4.you can edit the bitrate but the higher the bitrate the bigger the size
5. choose the songs you want to convert and click start

**if you want to try something different repeat step one and 2 and instead of making the destintion type mp3 pro make it 'mp3pro vbr'

again the lower the setting the smaller the size


Monday, November 3, 2008

Multiple okut in firefox

Login with multiple ids at the same time in orkut , gmail , yahoo


Step 1:
open system properties(by right clicking my computer), choose tab advanced, click to environment variables button. in system variables section, click new. type this information to each textbox.

variable name: moz_no_remote(should be all small letter)

variable value: 1

press ok to close all windows.

step 2:
open firefox icon's properties(from desktop and quick launch). add extension -p to command line(like "c:\program files\mozilla firefox\firefox.exe" -p). press ok.

while starting firefox u have to create two separate profiles of firefox so that u can login to two accounts of any(orkut,yahoo,rediff or anything else).......
for three logins create three profiles of firefox.........


Disable autocomplete in Internet Explorer

You may want to disable autocomplete in Internet Explorer for security reasons. Maybe you have noticed that Internet Explorer stores your previous entries in the web address bar, or in web forms where you enter personal information or user names to log on.

If you share your computer with other people and you don't want them to see your previous entries, you can simply disable autocomplete in IE.

* In Internet Explorer, click on the Tools menu and select Internet Options
* Select the Content tab
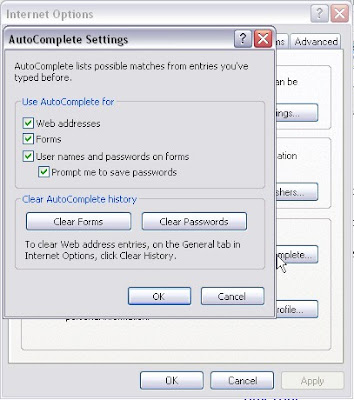
* Under "Personal Information", click on the "AutoComplete" button


Internet Explorer offers different levels of privacy :

The web addresses check box specifies if you want Internet Explorer to automatically list previously entered internet addresses as you type them in the address bar. Deselect this check box if you don't want IE to list these entries.

The forms check box specifies if you want IE to list entries you've used before when filling in your name and address information in a web form. Deselect the check box to disable this option.

The user names and passwords check box makes IE automatically fill in the username and password information when you are visiting web pages that you have visited before.

Click the "Clear forms" and "Clear passwords" buttons to remove the information that Internet Explorer had previously stored for you.

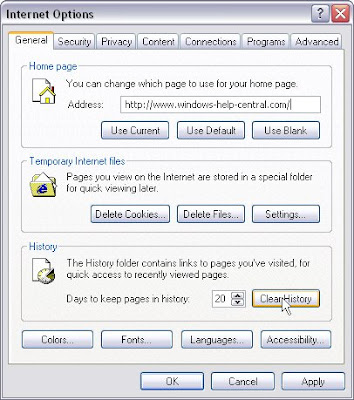
The text below these buttons indicate that you cannot remove stored web address entries from this dialog. Instead, click the ok button in this "Autocomplete Settings" dialog, then click the "General" tab and click the "Clear History" button. This clears the entire history, you cannot clear individual entries from the history list.


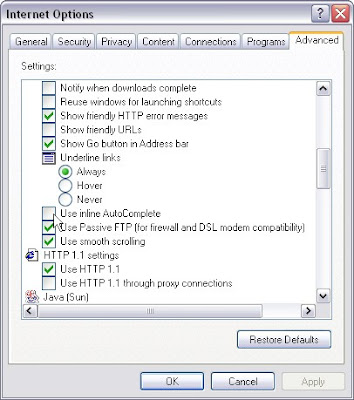
If you want to completely disable autocomplete, click the "Advanced" tab in the Internet Options dialog, scroll down to "Use Inline Autocomplete" and deselect the check box.


Make Use Of Your Windows Key

The Windows logo key, located in the bottom row of most computer keyboards is a little-used treasure. Don't' ignore it. It is the shortcut anchor for the following commands:

Windows: Display the Start menu
Windows + D: Minimize or restore all windows
Windows + E: Display Windows Explorer
Windows + F: Display Search for files
Windows + Ctrl + F: Display Search for computer
Windows + F1: Display Help and Support Center
Windows + R: Display Run dialog box
Windows + break: Display System Properties dialog box
Windows + shift + M: Undo minimize all windows
Windows + L: Lock the workstation
Windows + U: Open Utility Manager
Windows + Q: Quick switching of users (Powertoys only)
Windows + Q: Hold Windows Key, then tap Q to scroll thru the different users on your PC


Get The Drivers You Need

- Visit Windows Update (XP Only)
- Look at the left hand pane and under Other Options click Personalize Windows Update.
- Now in the right hand pane check the box - Display the link to the Windows Update Catalog under See Also
- Below Choose which categories and updates to display on Windows Update - make sure you check all the boxes you want shown.
- Click Save Settings
- Now look in the left hand pane under See Also click Windows Update Catalog and choose what you're looking for. Choose either MS updates or drivers for hardware devices.
- Start the Wizard and off you go.

There are a TON of drivers there. I highly recommend you take a look at this page prior to downloading something from the web.

Save Your New Downloads

Since some people are still using modems and since MS is issuing patches right and left for XP wouldn't it be nice if after you downloaded all the updates you could save them? Well, you can and MS has provided a way for you to do it.
Here's How:
- Logon to Windows Update
- Choose Windows Update Catalogue (left hand pane)
- Choose Find updates for Microsoft Windows operating systems (right hand pane)
- Choose your version and language then Search
- Choose one the following:
- Critical Updates and Service Packs
- Service Packs and Recommended Downloads
- Multi-Language Features (0)
- Once chosen simply click on what you want to download and then back at the top click Review Download Basket
- You are taken to the next page where at the top you can specify where the downloads are to be saved.
- Click Download now.

Each patch will make a directory under the root of the folder you saved them to. Once finished you need to go to where you saved the file (s) to and then simply install all your patches.
Read-me's are available in each patch section so you know which one you are installing.


Speed Up Browsing

When you connect to a web site your computer sends information back and forth. Some of this information deals with resolving the site name to an IP address, the stuff that TCP/IP really deals with, not words. This is DNS information and is used so that you will not need to ask for the site location each and every time you visit the site. Although Windows XP and Windows XP have a pretty efficient DNS cache, you can increase its overall performance by increasing its size. You can do this with the registry entries below:

Windows Registry Editor Version 5.00
[HKEY_LOCAL_MACHINE\SYSTEM\CurrentControlSet\Services\Dnscache\Parameters]
"CacheHashTableBucketSize"=dword:00000001
"CacheHashTableSize"=dword:00000180
"MaxCacheEntryTtlLimit"=dword:0000fa00
"MaxSOACacheEntryTtlLimit"=dword:0000012d

Make a new text file and rename it to dnscache.reg. Then copy and paste the above into it and save it. Merge it into the registry.


Disable Attachment restrictions in Outlook from Office

[HKEY_CURRENT_USER > Software > Microsoft > Office > 10.0 >Outlook > Security]

"Level1Remove" = "exe;bat;vbs"


"STOP” ERROR MESSAGES AT SHUTDOWN

Some users have gotten an error message similar to the following when attempting either to shutdown or restart Win XP:

STOP 0000009F, DRIVER_POWER_STATE_FAILURE
STOP 0x0000001E: KMODE_EXCEPTION_NOT_HANDLED
STOP 0x000000D1: DRIVER_IRQL_NOT_LESS_OR_EQUAL

TechNet and the Microsoft Knowledge Base have numerous articles discussing this type of error condition; for example, these. As a review of these articles will show, these are commonly device driver problems, but may also be caused by troublesome software (such as the notorious CrashGuard), or a problem in a system service. MSKB article Q262575 discusses a shutdown problem of this type, known to exist in Windows 2000 due to a resource (IRQ) conflict, if you have PACE Interlok anti-piracy software installed. This problem may occur in Windows XP as well.
Microsoft advises the following as one approach to these problems: Restart the computer. Press F8 during the restart and select “Last Known Good Configuration.” If you catch the problem when it first occurs (meaning you likely have installed only one or two drivers or new service), this will return you to a previous working condition. (Would System Restore accomplish the same thing? I don’t know, and don’t have a broken system to test it on.)

Microsoft reported similarly that these STOP code error message occur when Windows XP is trying to shut down devices. He says that he has seen this twice: once with Logitech Quickcam installed (with an unsupported driver), and once with a USB DSL modem that would hang if it wasn’t disconnected before shutdown.

SHUTDOWN WORKS, BUT IT’S REAL SLOW.

If it appears that Win XP is not shutting down, give it some time. Some users have reported a minute or longer for shutdown to visibly start. Thus far, it appears that this is a consequence of software that is running when shutdown is attempted, and it also may have something to do with particular hardware. If you are experiencing this problem, be sure to close all running programs before attempting shutdown and see if this solves your problem. If so, then you can determine, by trial and error, which program(s) are involved.
One specific solution for this was provided by Microsoft support. ” In Control Panel | Administrative Tools | Services. (You can also get this by launching SERVICES.MSC from a Run box. This utility is also built into the Computer Management console.) Stop the Nvidia Driver Helper service. Many other friends quickly confirmed that this solved this “extremely slow shutdown” problem for them.

POWERDOWN ISSUES.

“Powerdown issues” are quite distinctive from “shutdown issues.” I define a shutdown problem as one wherein Windows doesn’t make it at least to the “OK to shut off your computer” screen. If Windows gets that far, or farther, then it has shut down correctly. However, the computer may not powerdown correctly after that. This is a different problem, and I encourage that people reporting these issues to make a very clear distinction in their labeling.

When Windows XP won’t powerdown automatically, the APM/NT Legacy Power Node may not be enabled. To enable this, right-click on the My Computer icon, click Properties | Hardware | Device Manager | View. Check the box labeled “Show Hidden Devices.” If it’s available on your computer, there will be a red X on the APM/NT Legacy Node. Try enabling it and see if this resolves the powerdown problem.

This should resolve the powerdown issue in most cases. However, other factors can sometimes interfere with correct powerdown functioning. In that case, consider the following tips:
· If you are changing the default power settings in the BIOS, it can lead to a powerdown problem. Restoring all BIOS power settings to default will likely fix it.

OTHER KNOWN ISSUES & HINTS.

· BIOS UPGRADE.
As with every new operating system that comes along - especially one that is as much of a “step up” as Windows XP is from Windows 9x - the recommendation is made to be sure your BIOS is updated. Many people have reported that this has solved their shutdown problems (and had other advantages) with Win XP, just as it has in earlier versions of Windows.


Setup XP from a Network drive

You use three switches. If D: is the target, and G: is the net drive.

G:i386winnt32 /tempdrive:D /makelocalsource /s:G:i386


Use the Internet Connection Firewall to Secure Your Small Network

A firewall is a security system that acts as a protective boundary between a network and the outside world. Windows XP includes Internet Connection Firewall (ICF) software you can use to restrict what information is communicated between the Internet and your home or small office network. ICF also protects a single computer connected to the Internet with a cable modem, a DSL modem, or a dial–up modem.

If your network uses Internet Connection Sharing (ICS) to provide Internet access to multiple computers, you should use ICF on the shared Internet connection. However, ICS and ICF can be enabled separately. You should not enable the firewall on any connection that does not directly connect to the Internet, and ICF is not needed if your network already has a firewall or proxy server.

You must be logged on to your computer with an owner account in order to complete this procedure. You should not enable Internet Connection Firewall on virtual private networking (VPN) connections or on client computers because ICF will interfere with file and printer sharing. ICF cannot be enabled on the private connections of the Internet Connection Sharing host computer.


To enable or disable Internet Connection Firewall

Open Network Connections (Click Start, click Control Panel, and then double–click Network Connections.)

Click the Dial–up, LAN or High–Speed Internet connection that you want to protect, and then, under Network Tasks, click Change settings of this connection.

On the Advanced tab, under Internet Connection Firewall, select one of the following:

To enable Internet Connection Firewall (ICF), select the Protect my computer and network by limiting or preventing access to this computer from the Internet check box.

To disable Internet Connection Firewall, clear the Protect my computer and network by limiting or preventing access to this computer from the Internet check box. This disables the firewall, your computer and network are then vulnerable to intrusions


Remove shortcut arrow from desktop icons

Here's how you can remove those shortcut arrows from your desktop icons in Windows XP.

1. Start regedit.
2. Navigate to HKEY_CLASSES_ROOTlnkfile
3. Delete the IsShortcut registry value.

You may need to restart Windows XP.


WinXP Clear Page file on shutdown

Go to Control panel Administrative tools, local security policy. then goto local policies ---> security options.
Then change the option for "Shutdown: Clear Virtual Memory Pagefile"


Reduce Temporary Internet F ile Space

he temporary internet files clutter your hard drive with copies of each page visited. These can build up over time and take up disk space. Even more bothersome is that instead of getting new pages each time IE often takes the page out the temp internet files. This can be a problem if you are viewing a website that is updated all the time. If you are on a slow connection such as a 56K or lower then this can be good but if you are on a fast broadband connection, like me, then you can get away with decreasing the size of your temp internet files to just one meg without any performance decrease.

Launch Internet Explorer.
Select the Tools from the menu bar.
Then select Internet Options... from the drop down menu.
Once the internet options has loaded click on the general tab.
Under the temporary internet files section click the settings button.
A settings window will load. Slide the slider all the way to the left so the size indicated in the text box on the right is one.
Click OK
Click Ok


Customize Internet title bar

In regedit navigate to this key:

HKEY_CURRENT_USERSoftwareMicrosoftInternet ExplorerMain

change the value of the string "Window Title" to whatever you want on the title bar of Internet Explorer - to have no title except the title of the web pages you are browsing do not enter anything for a value.


Rename a Series of Files

When you download photos from your digital camera, they often have unrecognizable names. You can rename several similar files at once with the following procedure. This also works for renaming other types of files.

1.Open the My Pictures folder. (Click Start, and then click My Pictures.) Or open another folder containing files that you want to rename.
2.Select the files you want to rename. If the files you want are not adjacent in the file list, press and hold CTRL, and then click each item to select it.
3.On the File menu, click Rename.
4.Type the new name, and then press ENTER.


All of the files in the series will be named in sequence using the new name you type. For example, if you type Birthday, the first will be named Birthday and subsequent files in the series will be named Birthday (1), Birthday (2), and so on. To specify the starting number for the series, type the starting number in parentheses after the new file name. The files in the series will be numbered in sequence starting with the number you type. For example, if you type Birthday (10), the other files will be named Birthday (11), Birthday (12), and so on.


For a Safer, faster XP Close Unwanted Services

To disable unneeded startup services for a safer, faster XP, use the "Services" Admin Tool (Control Panel > Administrative Tools > Services). If you are a single user of a non-networked machine, you can disable the following items, with no ill effect.

Alerter
Clipbook
Computer Browser
Fast User Switching
Human Interface Access Devices
Indexing Service (Slows the hard drive down)
Messenger
Net Logon (unnecessary unless networked on a Domain)
Netmeeting Remote Desktop Sharing (disabled for extra security)
Remote Desktop Help Session Manager (disabled for extra security)
Remote Procedure Call Locator
Remote Registry (disabled for extra security)
Routing & Remote Access (disabled for extra security)
Server
SSDP Discovery Service (this is for the utterly pointless "Universal P'n'P", & leaves TCP Port 5000 wide open)
TCP/IP NetBIOS Helper
Telnet (disabled for extra security)
Universal Plug and Play Device Host
Upload Manager
Windows Time
Wireless Zero Configuration (for wireless networks)
Workstation


Save the Windows Updates to your Drive

If you want to save your files to your hard drive, so after a format you dont have to download them all again, here's How:

- Logon to Windows Update

- Choose Windows Update Catalogue (left hand pane)

- Choose Find updates for Microsoft Windows operating systems (right hand pane)

- Choose your version and language then Search

- Choose one the following:

- Critical Updates and Service Packs
- Service Packs and Recommended Downloads
- Multi-Language Features (0)


- Once chosen simply click on what you want to download and then back at the top click Review Download Basket

- You are taken to the next page where at the top you can specify where the downloads are to be saved.

- Click Download now. Each patch will make a directory under the root of the folder you saved them to.
Once finished you need to go to where you saved the file (s) to and then simply install all your patches.


Tuesday, October 14, 2008

Disable Monitor Power-off on Logon Screen

To Disable Monitor Power-off on Logon Screen copy th elines and save as somefilename.reg and just double clik it or right clicka nd select Merge option


Windows Registry Editor Version 5.00

[HKEY_USERS\.DEFAULT\Control Panel\Desktop]
"PowerOffActive"="0"


Enable Monitor Power-off on Logon Screen

To Enable Monitor Power-off on Logon Screen copy th elines and save as somefilename.reg and just double clik it or right clicka nd select Merge option


Windows Registry Editor Version 5.00

[HKEY_USERS\.DEFAULT\Control Panel\Desktop]
"PowerOffActive"="1"
"ScreenSaveActive"="1"
"SCRNSAVE.EXE"="(None)"


Overcome Windows XP error: svchost.exe - Application Error

You might have come up with svchost.exe -- application error the instruction at "0x745f2780" reference memory at "0x00000000". the memory could not be 'read' error

Once this error is closed you can't start anything - and XP crashes when trying to shut down.

Fortunately, if you don't close any of the error messages down, windows still works.

To fix it

* Go 2 the start menu
* Right click "my computer"
* Click "properties" then the "automatic updates" tab
* Choose "turn off automatic updates"
* Reboot your computer
* Go back to start menu and in all programs go to "windows update" you have to be
connected to the internet.
* Manually update windows.
* Turn your automatic updates back on.

This fill fix up the Problem


Warn If CAPS LOCK key is Pressed using Beep

when you are typing text very fast and by mistake you hit the caps lock key ,If you like to Warn you that CAPS is ON do the settings

or Windows XP users:

In Control Panel > Accessibility Options, and at the bottom of the screen, check the box next to Use ToggleKeys and click OK.

For Windows Vista users:

In Control Panel > Ease of Access > Change how your keyboard works. Then check the box next to Use ToggleKeys and click Save.

Now if you press CAPS LOCK,NUM LOCK, SCROLL LOCK key you will be warned by a BEEP sound .


Remove The “Use Web To Find Program To Open Unknown File Type"

Whenever you click on any unknown file format then what you get is the dialog box which gives you two options:

* Use the web service to find the appropriate program (to open that particular file format.)
* Select the program from a list.


Most Probably you will select the second option and find the appropriate program your list (the list contains those programs which are already installed in your computer.


To remove this

Open the registry editor(click Start > Run, type regedit, and press Enter)

Now in the left pane of the window browse to the following key:

HKEY_LOCAL_MACHINE \ SOFTWARE \ Microsoft \ Windows \ CurrentVersion \ Policies \ Explorer

Now in the right pane of the window create a 32-bit DWORD value:

* Name: NoInternetOpenWith
* Value: 1


No restart Required .


Wish to Have a No to All option while overwriting huge number of Files (like Yes to All option)

While overwriting large number of files in Windows, there exists an option for committing ‘Yes To All’ to overwrite all the files but there isn’t any ‘No To All’ option.

To get a No To All effect Simply hold down the ‘Shift’ key while clicking on the No option and Windows will interpret this as a ‘No To All’ option!


Make your Screen Bigger- Hidden Xp Tricks

To make your Screen Bigger press ALT SHIFT and PRINT SCREEN

Normal Screen


Press Ok


Now see the Magic :)


To revert to normal press again ALT SHIFT and PrintScreen


Disable Indexing Service In Windows XP And Save CPU And RAM

Indexing service in Windows XP is programmed to keep a log of all the new and old files so that you can get quick results once you search for some file. But in normal case its not Much usefull, you can disable it to save CPU and RAM space

n Control Panel under Administrative Tools double-click on Services icon and then browse to Indexing Service. Double-click on it and from the Indexing Service Properties choose disabled as startup type.


Click ok and just restart .


Wednesday, October 8, 2008

Registry Tweaks

Display legal notice on startup:

Wanna tell your friends about the do's and dont's in your computer when they login in your absence. Well you can do it pretty easily by displaying a legal notice at system start up.

REGEDIT
[HKEY_LOCAL_MACHINE\SOFTWARE\Microsoft\Windows\CurrentVersion\policies\system]
"legalnoticecaption"="enter your notice caption"
"legalnoticetext"="enter your legal notice text"

Automatic Administrator Login:

Prove that Windows XP is not at all secure as multi-user operating system. Hacking the system registry from any account having access to system registry puts you in to the administrator account.

REGEDIT 4
[HKEY_LOCAL_MACHINE\SOFTWARE\Microsoft\Windows NT\CurrentVersion\Winlogon]
"AutoAdminLogon"="1"

No Shutdown:

To remove the shutdown option from start menu .

Regedit
HKEY_CURRENT_USER\Software\Microsoft\Windows\CurrentVersion\Explorer
"NoClose"="DWORD:1"


Disabling My Computer

In areas where you are trying to restrict what users can do on the computer, it might be beneficial to disable the ability to click on My Computer and have access to the drives, control panel etc.
To disable this:
1.Open RegEdit
2.Search for 20D04FE0-3AEA-1069-A2D8-08002B30309D
3.This should bring you to the HKEY_CLASSES_ROOT\CLSID section
4.Delete the entire section.
Now when you click on My Computer, nothing will happen.
You might want to export this section to a Registry file before deleting it just in case you want to enable it again. Or you can rename it to 20D0HideMyComputer4FE0-3AEA-1069-A2D8-08002B30309D. You can also hide all the Desktop Icons, see Change/Add restrictions.


Protection on system files

To enable protection on system files such as the KnownDLLs list, add the following value;

1. Open RegEdit
2. HKEY_LOCAL_MACHINE\System\CurrentControlSet\ Control\ SessionManager
3. Create the a Dword value and name it "ProtectionMode "
4. Set the Value to 1


Adding an Application to the Right Click on Every Folder

Here is how to add any application to the Context Menu when you right click on any Folder. This way you do not have to always go to the Start Menu. When you right click on any folder, you can have access to that application, the same as using Sent To.

1. Open RegEdit
2. Go to HKEY_CLASSES_ROOT\Folder\shell
3. Add a new Key to the "Shell" Key and name it anything you like.
4. Give it a default value that will appear when you right click a folder, i.e. NewKey (use an "&" without the quotes, in front of any character and it will allow you to use the keyboard)
5. Click on the Key HKEY_CLASSES_ROOT\Folder\shell\NewKey
6. Add a New Key named Command
7. Set the (Default) value of the application you want to run
8. For example: c:\program files\internet explorer\iexplore.exe (Include the full path and parameters if you need them)


Unlock the Lowest Screen Resolutions and Color Quality

1. Right-click the desktop

2. Highlight and click on "Properties"

3. Click on the "Settings" tab

4. Click the "Advanced" button

5. Click the "Adapter" tab

6. Click the "List All Modes..." button

7. Choose the valid mode you desire.

8. Click the "OK" button

9. Click the "OK" button again

10. Click the "OK" button one more time

There, that should do it. Enjoy!


Remove Control Panel Applets

According to Microsoft, the Group Policy Editor can be used to "Hides all Control Panel items." Before we get started I want to inform you that this tweak does not prevent the control panel applets from running, they just do not show up in control panel any more.

1. Click on the start button and select run.
2. In the text box type gpedit.msc and press OK.
3. Once the Group Policy Editor is open, expand the User Configuration folder if it is not already expanded.
4. Next, expand the Administrative Templates folder and then click on the Control Panel folder.
5. Select Show only specified Control Panel Applets from the right window pane and right click on it and select Properties.
6. A dialog box will open and select the enable radio button.
7. Once you have clicked on the enable radio button, the show button will be enabled, click it.
8. A new window will pop up that will display control panel objects that are OK to show. Items not on this list will not be displayed in control panel when this feature is enabled. To add a applet to the list so that it will show up in control panel, Click Add.
9. Once the add dialog box pops up, enter the name of the control panel applet you want to be displayed. This is were it gets a little tricky. You have to enter the filename of the applet you want shown. For example, if you want to show the System Properties applet, then you need to enter sysdm.cpl in the box.
10. Then click OK once you have entered the file name; click OK once more to exit the control panel applets settings.
11. Exit Group Policy editor and restart if needed.

Here are the Windows XP Pro Control Panel applets:
System Properties = sysdm.cpl
Network Connections = ncpa.cpl
ODBC Administrator = odbccp32.cpl
Display Properties = desk.cpl
Add or remove programs = appwiz.cpl
Internet Properties = Inetcpl.cpl
Game Controllers = joy.cpl
Phone and modem Options = telephon.cpl
Time and Date Properties = timedate.cpl
Region and Language Options = intl.cpl
Power Options = powercfg.cpl
Mouse Properties = main.cpl
Accessibility Options = access.cpl
Add Hardware Wizard = hdwwiz.cpl
Sound and Audio Devices = mmsys.cpl
User Accounts = nusrmgr.cpl
Speech Properties = sapi.cpl


Prevent Access to Registry Editing Tools and Access to Command Prompt

Prevent Access to Registry Editing Tools

If this setting is enabled and the user tries to start a registry editor, a message appears explaining that a setting prevents the action.
To prevent users from using other administrative tools, use the "Run only allowed Windows applications" setting.

START > RUN > GPEDIT.MSC > USER CONFIGURATION > ADMINISTRATIVE TEMPLATES > SYSTEM > FIND PREVENT ACCESS TO REGISTRY EDITING TOOLS > RIGHT CLICK > PROPERTIES > CLICK ENABLE > OK > REBOOT


Prevent Access to Command Prompt


This setting also determines whether batch files (.cmd and .bat) can run on the computer.
If you enable this setting and the user tries to open a command window, the system displays a message explaining that a setting prevents the action.
Note: Do not prevent the computer from running batch files if the computer uses logon, logoff, startup, or shutdown batch file scripts, or for users that use Terminal Services.

START > RUN > GPEDIT.MSC > USER CONFIGURATION > ADMINISTRATIVE TEMPLATES > SYSTEM > FIND PREVENT ACCESS TO THE COMMAND PROMPT > RIGHT CLICK > PROPERTIES > CLICK ENABLE > OK REBOOT

Note: This will disable the command for all users including the local administrator. If you want to disable this for specific users only (and for XP Home users) make the change in the registry. Login to the account you want to change and create the following registry entries:

HKEY_CURRENT_USER\Software\Policies\Microsoft\Windows\System\
DisableCMD dword 0x00000001 to disable command prompt and batch files
or
DisableCMD dword 0x00000002 to disable command prompt but not batch files


Getting More Processing Power and Increase speed by tweaking prefetcher settings

Getting More Processing Power

"In the Run box, type "Rundll32.exe advapi32.dll,ProcessIdleTasks". This frees up any idle tasks running in the background so that Windows XP can devote its full attention to what you want it to do. For example playing graphic intensive games."

While it DOES free up idle tasks, according to Microsoft, it can take up to 15 minutes to do so. You would not want to run this task before playing a game or using your machine as it will actually cause any tasks waiting for the system to become idle to be performed immediately.


Increase speed by tweaking prefetcher settings

1. run "regedit";
2. goto [HKEY_LOCAL_MACHINE\SYSTEM\CurrentControlSet\Control\Session Manager\Memory Management\PrefetchParameters\EnablePrefetcher];
3. Set the value to either 0-Disable, 1-App launch prefetch, 2-Boot Prefetch, 3-Both ("3" is recommended).
4. reboot.

It should decrease the boot time and the time it takes to load programs.


Speed up log in

First, if there are any other users on your computer see if they have a similarly long log-in. If they don't the problem might be your roaming profile, which is a folder where XP stores your settings you can access them from anywhere in the network. Since these profiles can get really bloated and are not really necessary unless you log-in from different computers in a large network, you should disable it. Here's how:

1. Right click on My Computer, select the Manage option.

2. From the Management Console, select the Local Users and Groups option.

3. Double-Click on the Users folder that appears on the right panel.

4. Right click on the account with the slow log-in and select Properties.

5. Click on the Profile tab of the Properties Window.

6. Erase(but keep note a not of this) whatever path appears for Profile Path under User Profile and Local Path under Home Folder: LEAVE THESE LINES BLANK.

7. Reboot. Try to log-in into the problematic account, you should see a significant speed-boost, the computer might warn you once or twice that your Roaming Profile is not available, ignore it and it will go away, good luck!

Note: You also will not have your settings and files that a roaming profile provides across a network.


No more low disk space messages

go into registry with REGEDIT.EXE, go to
HKEY_CURRENT_USER\Software\Microsoft\Windows\CurrentVersion\Policies\Explorer\
and (if not already there) add DWORD (without quotes) "NoLowDiskSpaceChecks" and change the value to 1. Restart.


Clearing Google Internet Search History and Load Applications Faster

Clearing Google Internet Search History


Select "Internet Options" from the Internet Explorer "Tools" menu.
Select the "Content" tab at the top of the "Internet Options" window.
In the "Personal information" section at the bottom, click the "AutoComplete" button.
On the AutoComplete Settings window, click on the "Clear Forms" button.
You will get a window asking you to confirm clearing the history.
Click "OK", and you're done.


Load Applications Faster

1) Choose an application that you want to start up quicker.

2) Create a shortcut and place it on the desktop.

3) Right click the shortcut item and click properties.

4) In the target field you will have it pointing to the location of the application. For Example it will say "C:\Program Files\NetMeeting\conf.exe"

5) Add /prefetch:1 right after the last " marks in the target field. So you will have something that looks like this..

"C:\Program Files\NetMeeting\conf.exe" /prefetch:1

6) Amazingly the application will start up quicker. For some applications like Kazaa Lite and some other 3rd party applicatins, this tweak will not work. You will get an error messege if it doesn't work properly. If you get the error, just simply remove the /prefetch:1 from the target field of the shortcut and the original shortcut will work fine again.


10 tips for securing your computer

1. Update / patch ALL your software every now and then!

2. Check / adjust ALL your settings so they are safe, since they ARENT by default!

3. Use firewall, like ZoneAlarm!

4. Use good passwords: at least 13marks long, containing both letters and numbers. Remember to chance your password every few months atleast!

5. Get a good antivirus program: F-Secure or Norton Antivirus and keep it updated!

6. Don’t open or execute files that you are not 100% sure are absolutely safe nomatter where or how you get them.

7. Wipe your historyfiles (like cookies, internet history and temporary files, etc.), logs and personal files, with specific wiping program (like Eraser) instead of just deleting them.

8. Use encryption to enhance your privacy! Use encrypted email (like Hushmail or Ziplip) and encrypt sensitive files on your computer (PGP).

9. Don’t use public computers for anything you need to type in your logins, they usually have Trojan horses that capture your passwords.

10. Don’t assume anything. If you don’t know, find out! If you cant or don’t understand, ask someone who knows! There’s nothing more dangerous than doing something you don’t really know anything about. That’s the best way to cripple your system or get a Trojan horse on your computer!


XP Stuffs

Desktop Gone Forever
If you can do without the regular NT 4.0 desktop permanently, it's possible to start with just the Task Manager even without Command Prompt. Launch the Registry Editor and locate HKEY_LOCAL_MACHINE/SOFTWARE/Microsoft/ CurrentVersion/WinLogon. Double-click on value named Shell (set by default to Explorer.exe). Enter Taskmgr.exe for the NT Task Manager. For a command prompt, enter Cmd.exe. Close the Registry Editor and log off.

Using the Windows Task Manager
Windows Task Manager can aid you in finding the amount of RAM you can regain by disabling unnecessary system services. Right-click on the taskbar and select Task Manager from the context menu. You can view the CPU usage and memory usage under the Performance tab, To regain resources, you can kill unnecessary processes from the Processes tab.

Fast Menus
You can change the Start menu delay in displaying sub-menus. Run Regedit adn navigate to HKEY_CURRENT_USER \Control Panel\Desktop. Change the value for MenuShowDelay to any number between 0 (fastest) and 4000 (slowest). If the above does not exist, add a string value with this name.

Launch Faster
You can change the default boot delay of 30 seconds. Open Control Panel > System > Startup/Shutdown. Under the Show List For, change the settings to the desired boot delay value. To bypass the boot menu altogether, set the delay to 0. Note: If you dual boot between the Operating Systems using the NT boot loader, do not set the boot delay value to 0.

Messing with Partitions
Before using Disk Administrator to make changes to the partitions, you may want to make sure you save your current configuration. To do this, click Start > Programs > Administrator tools > Disk Administrator > Partition > Configuration > Save. Insert a formatted floppy disk into your drive and click OK. You can restore the partition structure later by clicking on Partition > Configuration > Restore.

Performance Monitor
The Performance Monitor will not monitor disk performance unless you turn on the disk counters first. to do this, open the Command Prompt window and type diskperf -Y. r\Restart the computer. you can monitor disk activity with the Performance, you should turn them off by typing diskperd -N at the Command Prompt when you have finished testing.

Sharing Resources Secretly
To secretly share a resource, simple append a dollar sign ($) to share name. When you do so, the resource doesn't appear in Network Neighborhood, but is readily available by either mapping the drive or typing the UNC in the Run dialog box. This provides an additional degree of privacy and security to a shared resource. Further more, and access restrictions or passwords assigned to that shared resource remain in effect.

NT Protocol Analyser
NT server 4.0 includes a software-based protocol analyzer called the Network Monitor Agent. To install it open Control Panel > Network > Services and click on Add. Select Network Monitor Agent from the list. You can now start Network Monitor from the Administrative Tools. To capture network data, click on Capture > Start. Click Capture > Stop to stop monitoring.

Alerter and Messenger
If messages don't reach their destination's) when using "net send" command, turn on the Alerter and Messenger serviced in the Services applet of the Control Panel. also, make sure that the intended recipient is not logged in to multiple machines.

Adding a Command Prompt to any Folder
Open Explorer and click View > Options > File Types. Locate Folder and click Edit. Click New to open the New Action dialog box. Type Command Prompt in the Action box, and type cmd.exe in the Application Used to Perform Action box. Now you can right-click a folder and click Command Prompt to open a Command Prompt window at the folder's path.

AutoComplete
You can automatically fill in file and folder names at the command prompt, much like a UNIX terminal. Launch the Registry editor and move down to the HKEY_CURRENT_USER \Software\Microsoft\Command Processor. Select CompletionChar and set its value of to 9. Restart the system for the changes to take effect. Now, at the Command Prompt window, type in the first few characters of the file or folders and press Tab to complete it automatically.

Saving Recent Desktop Settings
To save the Desktop settings on normal exits only. You could lose your recent Desktop modifications if NT crashes or hangs. you can save your current Desktop settings by selecting and object on the Desktop and pressing F5 key.

Key to the CD Key
The CD Key is required to reinstall the operating system. If you have lost it, you can retrieve it form the Windows registry. Open Regedit and navigate to HKEY_LOCALMACHINE\SOFTWARE\Microsoft\WindowsNT \CurrentVersion. Look at ProductId. The CD Key is digits 6 thought 15.

The Bin is Full
To change the icons used for the Recycle bin, run the Registry Editor and navigate to HKEY_LOCAL_MACHINE\Software\Classes\CLSID\ {645F040-5081-101B-9F08-00AA002F954E}\DefaultIcon. Edit the value labeled Full and type the path to the icon file. Similarly, edit the value labeled Empty Empty to specify the icon for the empty recycle bin.

Compressing data
Windows NT lets you compress and decompress directories and files on NTFS partition. Compression reduces storage requirements for seldom-accessed files without degrading overall drive performance. You can compress and expand files and directories form My Computer or Explore - just right-click on item, select Properties and enable Compress form the list of attributes.

Drop and Run
You can open the Run dialog box (Start > Run), then drag and drop a file or application onto it form My Computer or Explorer. The compete pathname appears in the Run dialog box. Now you could add command-line options or simple click OK to launch the file.

Re-create NT installations disks
You can re-create NT installation disks if you lose or damage your original set. Format three floppy disks and load your 4.0 CD-ROM in the drive. Form the Run dialog box, browse to the i386 folder on the CD-ROM and select winnet32.exe and click Open. Alter the Run command like to d:\i386\winnt32/ox (where the first d is the CD-ROM drive letter). Click OK and follow the prompts.

List of settings and address
For a complete list of the settings and address currently assigned to your system, open the Command Prompt form the Start button's Program menu, and type ipconfig/all. this will display all TCP/IP relates settings on the system. This is similar to winipcfg in Windows 9x.

Easy addition of users
Creating a user template makes if easy to add multiple new users with the same group and access privileges. Open User Manager for Domains. Add a new user by selecting New User form the User menu. Label this user as a template for the user level, such as Template--Worker or Template--Secretary and set the correct privileges and options for Groups, Profile, and Dial-in. the next time you need to add a user, simple select the template account, and select User > Cope from the menu. All you need to do is changed the name and password.

Maintaining a Repair disk
The Emergency Repair Disk (ERD) holds a record of the settings and boot parameters for your primary partition Boot Sector. Every time you make a change to these areas, you should also re-crease the ERD; otherwise, the repair disk will not restore your system to the most recent functioning state. To crease an updated ERD, type rdisk /s in the Run dialog box.

Documentation Books on your hard drive
Wish to avoid inserting the NT CD-ROM every time you access Books Online? Simple cope the \Support\Books form the CD-ROM to your hard drive. Next, remove the disc form the drive and attempt to launch the Books Online Shortcut. When you're prompted to insert the CD-ROM or specify an alternate route, click the Browse button, and select the directory where you copied the files.

Restoring a damaged boot sector
An up-to-date Emergency Repair Disk (ERD) can aid you in recovering from a damaged boot sector. To restore a damaged boot sector, reboot the computer using the Setup disk 1, followed by disk 2 when prompted. Select R for Repair. Form the next menu, select only Inspect boot sector (to check the boot sector for damaged). Insert disk 3 and then the ERD when prompted and follow the instructions on screen.


Outlook Tips

Saving Background Sounds
It is possible to save background sounds embedded into email onto your hard disk. Open Tools > Options > Send. Change both Mail sending formats to plain text. Open the message you want to grab the sound from and click on Forward. The sound files will appear attached to the forwarded message. Save the files from here and close the message. you can now reset any HTML settings that you changed.

Import messages and address easily

Outlook Express lets you import messages and addresses from other popular mail clients. Click File > Import and choose the appropriate item to import. Follow the instructions on the Outlook Express Import Wizard.

Beauty in pictures
Instead of sending pictures as attachments, insert the photo directly into the message. this way, the image will not have to be opened separately. Make sure that the recipient can receive HTML messages. To embedded an image into a mail message, while composing a message, click on Insert > Picture and choose the image you wish to insert. The image will be received as part of the message instead of an attachment (depending on the recipient's mail client).

Message Rules

You can instruct Outlook Express on what to do with messages you receive from Tools > Message Rules. For example, if you keep receiving spam from a particular address, you can block all messages from that address. Open Tools > Message Rules > Mail. in the Message Rules dialog box, click on New. Select where from line contains people and click on the contains people link below. Type in the annoying address. For the Actions, select Delete it from server. this way, any mail from that address will never be downloaded. Provide a name for the rule and click OK.

Identities
Outlook Express implements Identities - personal profiles with in Outlook Express that you login into, so that you can keep your e-mail private. Click on File > Identities > Add New Identity to add a new identity. Follow the instructions on screen. From File > Identities > Manage Identities, you can set the default identity to start with and also provide password for each identity.

HTML Source Editing
Message in HTML format are similar to Web pages with Outlook Express 5, you can edit the HTML source for message and even use HTML feature that are not listed within Outlook Express. When composing a message, click on View > Source Edit. Click on the Source tab and edit the source.

Hotmail
You can now add a Hotmail account to Outlook Express and view it as any POP account. To sign up for a new account, open Tools > New Account Signup > Hotmail. Follow the instructions on screen. if you already have an account with Hotmail, click on Tools > Accounts > Add > Mail. Provide the Display name and click Next.

Drag-n-Drop file attachments
With Outlook Express, you can quickly attach a file from your desktop or any folder to any outgoing message. Simple drag the file into the message area of your e-mail. outlook Express automatically inserts it as a file attachment. Similarly, you can drag file attachments from received email to save them to the desktop or a folder.


Disable the Turn off computer button on the Welcome screen

By default, the Microsoft Windows XP logon screen displays a Turn off computer button. This display seems convenient, until one of your kids happens to shut down your computer and close all your programs. To prevent this from happening, you can disable the Turn off computer button. You can still shut down your computer; you just have to log on with a computer administrator account first.

To disable the Turn off computer button on the Welcome screen

1.
Log on to your computer as an administrator. Click Start, and then click Control Panel.

2.
Click Performance and Maintenance

3.
Click Administrative Tools..


4.
Double-click Local Security Policy.

5.
Expand Local Policies by clicking the plus sign next to it, and then click Security Options.

6.
In the right pane, double-click the Shutdown: Allow system to be shut down without having to log on policy.

7.
Click Disabled, and then click OK.

Windows XP removes the Turn off computer button from the Welcome screen—so no more shutting down without logging on!


Change the default folder opened in Windows Explorer

Microsoft Windows Explorer, which is accessible through the Start menu, is the tool you use to look through the files and drives on your computer.

When you start Windows Explorer from the Start menu, it opens your My Documents folder by default. However, a My Documents shortcut already exists on your Start menu. You can put the Windows Explorer shortcut to better use by changing it to display all top-level drives and folders on your system. This change will give you a broad, overall view of all your folders and files.

To change how Windows Explorer opens

1.
Click Start, point to All Programs, point to Accessories, right-click Windows Explorer, and then click Properties


2.
The Target box currently shows %SystemRoot%\explorer.exe
At the end of the line, type the characters /n, /e, /select, C:\
The line should now read %SystemRoot%\explorer.exe /n, /e, /select, C:\


Be sure you insert blank spaces in the correct locations. Then, click OK.


Now, when you open Windows Explorer, it will display all of your folders and drives, not just your My Documents folder.


Speed up menu display

Microsoft Windows XP uses many visual effects to provide a rich, friendly interface. One of these settings allows menus to fade into view when you open them. This visual effect is so smooth that you may never have noticed it; however, the effect does cause menus to take a little longer to appear.
On a fast computer, this shouldn't be an issue. But on a computer that isn’t responding as quickly as you'd like, you can make menus display faster.
To speed up menu display
1.
Click Start. Right-click My Computer, and then click Properties.

2.
Click the Advanced tab. In the Performance area, click Settings.

3.
On the Visual Effects tab in the Performance Options dialog box, clear the Fade or slide menus into view check box.

4.
Click OK.

5.
In the System Properties dialog box, click OK.
Now when you click a menu, it will appear almost instantly.


Set your windows so they all have the same view

Microsoft Windows XP lets you show the contents of folders in a variety of ways, such as a simple or detailed list of the files, or as thumbnail images. Each folder in My Computer or My Documents can have its own view. That’s useful for folders like My Music or My Pictures, because you can look at your digital photos in Thumbnails or Filmstrip view, and see your song titles in Tiles view. But changing the view for every folder can be time-consuming.
If you prefer to have all your folder contents displayed in a particular way, you can save yourself some time by changing the view for all the folders on your computer at once.
To set your windows so they all have the same view
1.
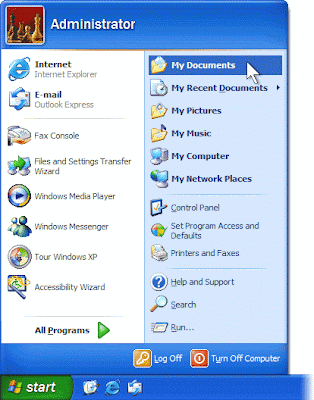
Click Start, and then click My Documents.


3.
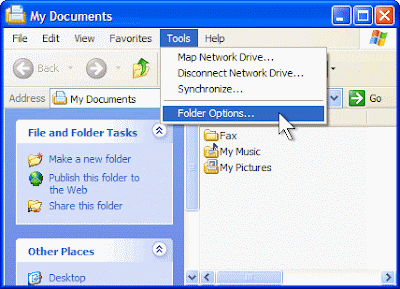
Click Tools, and then click Folder Options.


2.
Click the Views button, and then click the view you want to apply to all folders.
Note: For more information about views


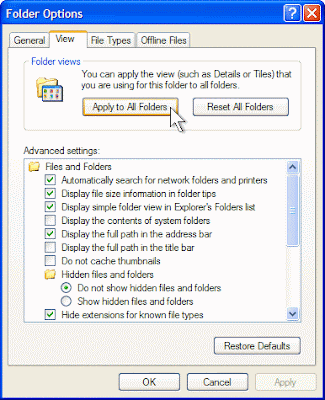
4. Click the View tab, and then click Apply to All Folders.


Now all your Windows will have the same View


Key Board Short Cuts


The mouse, one of the greatest advances in computing history, provides you with an intuitive point-and-click method for using your computer. Depending on the type of work you're doing, however, sometimes using a mouse actually slows you down. If you are a good typist, taking your hands away from the keyboard to move the mouse can use up a few seconds. Over the course of a full day, you could save several minutes by using keyboard shortcuts instead of the mouse.

You can use your keyboard instead of your mouse to do these three tasks:

• Start a program

• Navigate menus

• Minimize, maximize, and close windows

Start a program using a keyboard shortcut
The Start menu is great for finding programs, but its multiple levels of folders can be time consuming to navigate. If there is a program you start frequently, you should set a keyboard shortcut for it so that you can start the program without taking your hands off the keyboard.

To set a keyboard shortcut to start a program

1.
Click the Start menu, and then click All Programs. Right-click the program that you want to start with a keyboard shortcut, and then click Properties.


2.
Click in the Shortcut key box. Now press the letter on your keyboard that you want to use to start the program. Make it easy to remember—for example, press I for Microsoft Internet Explorer.
Note: You can use either uppercase or lowercase letters when creating your keyboard shortcuts—and when accessing them later. In the Shortcut key box, Microsoft Windows XP automatically adds Ctrl + Alt + before the key you pressed. When you want to start the program, hold down both the CTRL and ALT keys simultaneously, while also pressing the letter you chose. This way, your program won't start every time you type that letter.


3.
Click OK.


4.
Now test your shortcut. Hold down the CTRL and ALT keys, and then press the letter you chose. If you find it difficult to hold down two keys at once, Your program should start.


Navigate menus using the keyboard
You can speed up tasks in almost any program by choosing menu items using your keyboard instead of your mouse. This operation is particularly handy when you're performing repetitive tasks.
To control menus using your keyboard
1.
With your program open, press the ALT key. Notice that one letter on each menu name is now underlined. To open the menu, press the underlined key. For example, in Internet Explorer, the View menu name shows the V underlined after you press the ALT key. To open the View menu, press the ALT key, and then press V.

2.
Now, each menu item will show one letter underlined. To access or activate the menu item you want, simply press the underlined key. For example, in Internet Explorer, after you open the View menu, the Privacy Report menu item shows the V underlined. Instead of clicking Privacy Report with your mouse, you can just press the V key.

3.
You can also choose menu commands by pressing key sequences quickly, without waiting for the menus to open. For example, to quickly view a Web page's privacy report in Internet Explorer, press ALT, V, V. Similarly, to save a Web page in Internet Explorer, you would normally click the File menu, and then click Save As. To choose the same commands using your keyboard, press ALT, F, A.
Control windows using your keyboard
If you like to keep four or five windows open while you work (or play) on your computer, you'll appreciate knowing these keyboard shortcuts. You can quickly switch between your Web browser, e-mail, instant message windows, and other programs without taking your hands off the keyboard.
Action
Shortcut
Minimize a window to your taskbar
ALT, SPACEBAR, N
Maximize a window so it takes up your whole desktop
ALT, SPACEBAR, X
Restore a window so it's visible but doesn't take up your whole desktop
ALT, SPACEBAR, R
Close a window
ALT+F4
Switch to the last window you had open
ALT+TAB
Switch to any window
Hold down the ALT key, and press TAB until the window you want is active
Programs often start up in a "restored" state, where the window takes up only part of the screen. To maximize the window so that it takes up the entire screen, press the ALT key, press the SPACEBAR, and then press X. This will feel natural after you do it a few times, and you will feel much more efficient while using your computer.


Tuesday, October 7, 2008

156 Useful Run Commands

GO to RUN and enter these commands
scroll down


To Access….

Run Command

Accessibility Controls

access.cpl

Accessibility Wizard


accwiz


Add Hardware Wizard

hdwwiz.cpl


Add/Remove Programs

appwiz.cpl


Administrative Tools

control
admintools


Adobe Acrobat (if
installed)

AcroRd32.exe


Adobe Designer (if
installed)

acrodist


Adobe Distiller (if
installed)

acrodist


Adobe ImageReady
(if installed)

imageready


Adobe Photoshop (if
installed)


photoshop


Automatic Updates

wuaucpl.cpl


Bluetooth Transfer Wizard

fsquirt


Calculator

calc

Certificate Manager

certmgr.msc


Character Map

charmap


Check Disk Utility

chkdsk


Clipboard Viewer

clipbrd


Command Prompt

cmd


Component Services

dcomcnfg


Computer Management

compmgmt.msc


Control Panel

control


Date and Time Properties

timedate.cpl


DDE Shares

ddeshare


Device Manager

devmgmt.msc


Direct X Control Panel (If
Installed)*

directx.cpl


Direct X Troubleshooter

dxdiag


Disk Cleanup Utility

cleanmgr


Disk Defragment


dfrg.msc


Disk Management

diskmgmt.msc


Disk Partition Manager


diskpart


Display Properties


control desktop

Display Properties


desk.cpl


Display Properties
(w/Appearance Tab Preselected)


control color

Dr. Watson System
Troubleshooting Utility


drwtsn32

Driver Verifier Utility


verifier

Event Viewer


eventvwr.msc


Files and Settings
Transfer Tool


migwiz


File Signature
Verification Tool

sigverif


Findfast


findfast.cpl


Firefox
(if installed)

firefox


Folders Properties

control folders


Fonts

control fonts


Fonts Folder

fonts


Free Cell Card Game

freecell


Game Controllers

joy.cpl


Group Policy Editor (XP
Prof)

gpedit.msc


Hearts Card Game

mshearts


Help and Support

helpctr


HyperTerminal

hypertrm


Iexpress
Wizard


iexpress


Indexing Service

ciadv.msc


Internet Connection Wizard


icwconn1

Internet Explorer


iexplore


Internet Properties

inetcpl.cpl


Internet Setup Wizard


inetwiz


IP Configuration (Display
Connection Configuration)

ipconfig
/all


IP Configuration (Display
DNS Cache Contents)

ipconfig
/ displaydns


IP Configuration (Delete
DNS Cache Contents)

ipconfig
/ flushdns


IP Configuration (Release
All Connections)

ipconfig
/release


IP Configuration (Renew
All Connections)

ipconfig
/renew


IP Configuration
(Refreshes DHCP & Re-Registers DNS)


ipconfig
/ registerdns

IP Configuration (Display
DHCP Class ID)


ipconfig
/ showclassid

IP Configuration (Modifies
DHCP Class ID)

ipconfig
/ setclassid

Java Control Panel (If
Installed)

jpicpl32.cpl

Java Control Panel (If
Installed)

javaws


Keyboard Properties

control keyboard


Local Security Settings

secpol.msc


Local Users and Groups

lusrmgr.msc


Logs You Out Of Windows

logoff


Malicious Software Removal
Tool

mrt


Microsoft Access (if
installed)

access.cpl


Microsoft Chat

winchat


Microsoft Excel (if
installed)

excel


Microsoft
Frontpage (if installed)

frontpg


Microsoft Movie Maker


moviemk


Microsoft Paint

mspaint


Microsoft
Powerpoint (if installed)

powerpnt


Microsoft Word (if
installed)

winword


Microsoft
Syncronization Tool

mobsync


Minesweeper Game


winmine


Mouse Properties


control mouse

Mouse Properties


main.cpl


Nero (if installed)


nero


Netmeeting


conf

Network Connections

control
netconnections


Network Connections

ncpa.cpl


Network Setup Wizard

netsetup.cpl


Notepad

notepad


Nview
Desktop Manager (If Installed)


nvtuicpl.cpl


Object Packager

packager

ODBC Data Source
Administrator

odbccp32.cpl

On Screen Keyboard

osk


Opens AC3 Filter (If
Installed)


ac3filter.cpl

Outlook Express


msimn


Paint

pbrush


Password Properties

password.cpl


Performance Monitor

perfmon.msc


Performance Monitor

perfmon


Phone and Modem Options

telephon.cpl


Phone Dialer

dialer


Pinball Game

pinball


Power Configuration

powercfg.cpl


Printers and Faxes

control printers


Printers Folder

printers


Private Character Editor

eudcedit


Quicktime
(If Installed)


QuickTime.cpl


Quicktime
Player (if installed)


quicktimeplayer


Real Player (if installed)


realplay


Regional Settings

intl.cpl


Registry Editor

regedit


Registry Editor

regedit32


Remote Access Phonebook


rasphone


Remote Desktop

mstsc


Removable Storage

ntmsmgr.msc


Removable Storage Operator
Requests

ntmsoprq.msc


Resultant Set of Policy
(XP Prof)

rsop.msc


Scanners and Cameras

sticpl.cpl


Scheduled Tasks

control
schedtasks


>Security

Center


wscui.cpl


Services

services.msc


Shared Folders


fsmgmt.msc


Shuts Down Windows


shutdown

Sounds and Audio


mmsys.cpl


Spider Solitare

Card Game

spider


SQL Client Configuration

cliconfg


System Configuration
Editor

sysedit

System Configuration
Utility

msconfig


System File Checker
Utility (Scan Immediately)

sfc
/ scannow


System File Checker
Utility (Scan Once At Next Boot)

sfc
/ scanonce


System File Checker
Utility (Scan On Every Boot)

sfc
/ scanboot


System File Checker
Utility (Return to Default Setting)

sfc
/revert


System File Checker
Utility (Purge File Cache)

sfc
/ purgecache


System File Checker
Utility (Set Cache Size to size x)

sfc
/ cachesize=x


System Information

msinfo32


System Properties

sysdm.cpl


Task Manager

taskmgr


TCP Tester

tcptest


Telnet Client

telnet


Tweak UI (if installed)


tweakui


User Account Management

nusrmgr.cpl


Utility Manager

utilman


Windows Address Book


wab


Windows Address Book
Import Utility

wabmig


Windows Backup Utility (if
installed)

ntbackup


Windows Explorer

explorer


Windows Firewall

firewall.cpl


Windows Magnifier

magnify


Windows Management
Infrastructure

wmimgmt.msc


Windows Media Player


wmplayer


Windows Messenger

msmsgs


Windows Picture Import
Wizard (need camera connected)

wiaacmgr


Windows System Security
Tool

syskey


Windows Update Launches

wupdmgr


Windows Version (to show
which version of windows)

winver


Windows XP Tour Wizard

tourstart


Wordpad


write


if wrong please let me know .