1. Right-click the desktop
2. Highlight and click on "Properties"
3. Click on the "Settings" tab
4. Click the "Advanced" button
5. Click the "Adapter" tab
6. Click the "List All Modes..." button
7. Choose the valid mode you desire.
8. Click the "OK" button
9. Click the "OK" button again
10. Click the "OK" button one more time
There, that should do it. Enjoy!
Showing posts with label Windows Tips. Show all posts
Showing posts with label Windows Tips. Show all posts
Wednesday, October 8, 2008


Remove Control Panel Applets
According to Microsoft, the Group Policy Editor can be used to "Hides all Control Panel items." Before we get started I want to inform you that this tweak does not prevent the control panel applets from running, they just do not show up in control panel any more.
1. Click on the start button and select run.
2. In the text box type gpedit.msc and press OK.
3. Once the Group Policy Editor is open, expand the User Configuration folder if it is not already expanded.
4. Next, expand the Administrative Templates folder and then click on the Control Panel folder.
5. Select Show only specified Control Panel Applets from the right window pane and right click on it and select Properties.
6. A dialog box will open and select the enable radio button.
7. Once you have clicked on the enable radio button, the show button will be enabled, click it.
8. A new window will pop up that will display control panel objects that are OK to show. Items not on this list will not be displayed in control panel when this feature is enabled. To add a applet to the list so that it will show up in control panel, Click Add.
9. Once the add dialog box pops up, enter the name of the control panel applet you want to be displayed. This is were it gets a little tricky. You have to enter the filename of the applet you want shown. For example, if you want to show the System Properties applet, then you need to enter sysdm.cpl in the box.
10. Then click OK once you have entered the file name; click OK once more to exit the control panel applets settings.
11. Exit Group Policy editor and restart if needed.
Here are the Windows XP Pro Control Panel applets:
System Properties = sysdm.cpl
Network Connections = ncpa.cpl
ODBC Administrator = odbccp32.cpl
Display Properties = desk.cpl
Add or remove programs = appwiz.cpl
Internet Properties = Inetcpl.cpl
Game Controllers = joy.cpl
Phone and modem Options = telephon.cpl
Time and Date Properties = timedate.cpl
Region and Language Options = intl.cpl
Power Options = powercfg.cpl
Mouse Properties = main.cpl
Accessibility Options = access.cpl
Add Hardware Wizard = hdwwiz.cpl
Sound and Audio Devices = mmsys.cpl
User Accounts = nusrmgr.cpl
Speech Properties = sapi.cpl
1. Click on the start button and select run.
2. In the text box type gpedit.msc and press OK.
3. Once the Group Policy Editor is open, expand the User Configuration folder if it is not already expanded.
4. Next, expand the Administrative Templates folder and then click on the Control Panel folder.
5. Select Show only specified Control Panel Applets from the right window pane and right click on it and select Properties.
6. A dialog box will open and select the enable radio button.
7. Once you have clicked on the enable radio button, the show button will be enabled, click it.
8. A new window will pop up that will display control panel objects that are OK to show. Items not on this list will not be displayed in control panel when this feature is enabled. To add a applet to the list so that it will show up in control panel, Click Add.
9. Once the add dialog box pops up, enter the name of the control panel applet you want to be displayed. This is were it gets a little tricky. You have to enter the filename of the applet you want shown. For example, if you want to show the System Properties applet, then you need to enter sysdm.cpl in the box.
10. Then click OK once you have entered the file name; click OK once more to exit the control panel applets settings.
11. Exit Group Policy editor and restart if needed.
Here are the Windows XP Pro Control Panel applets:
System Properties = sysdm.cpl
Network Connections = ncpa.cpl
ODBC Administrator = odbccp32.cpl
Display Properties = desk.cpl
Add or remove programs = appwiz.cpl
Internet Properties = Inetcpl.cpl
Game Controllers = joy.cpl
Phone and modem Options = telephon.cpl
Time and Date Properties = timedate.cpl
Region and Language Options = intl.cpl
Power Options = powercfg.cpl
Mouse Properties = main.cpl
Accessibility Options = access.cpl
Add Hardware Wizard = hdwwiz.cpl
Sound and Audio Devices = mmsys.cpl
User Accounts = nusrmgr.cpl
Speech Properties = sapi.cpl
Prevent Access to Registry Editing Tools and Access to Command Prompt
Prevent Access to Registry Editing Tools
If this setting is enabled and the user tries to start a registry editor, a message appears explaining that a setting prevents the action.
To prevent users from using other administrative tools, use the "Run only allowed Windows applications" setting.
START > RUN > GPEDIT.MSC > USER CONFIGURATION > ADMINISTRATIVE TEMPLATES > SYSTEM > FIND PREVENT ACCESS TO REGISTRY EDITING TOOLS > RIGHT CLICK > PROPERTIES > CLICK ENABLE > OK > REBOOT
Prevent Access to Command Prompt
This setting also determines whether batch files (.cmd and .bat) can run on the computer.
If you enable this setting and the user tries to open a command window, the system displays a message explaining that a setting prevents the action.
Note: Do not prevent the computer from running batch files if the computer uses logon, logoff, startup, or shutdown batch file scripts, or for users that use Terminal Services.
START > RUN > GPEDIT.MSC > USER CONFIGURATION > ADMINISTRATIVE TEMPLATES > SYSTEM > FIND PREVENT ACCESS TO THE COMMAND PROMPT > RIGHT CLICK > PROPERTIES > CLICK ENABLE > OK REBOOT
Note: This will disable the command for all users including the local administrator. If you want to disable this for specific users only (and for XP Home users) make the change in the registry. Login to the account you want to change and create the following registry entries:
HKEY_CURRENT_USER\Software\Policies\Microsoft\Windows\System\
DisableCMD dword 0x00000001 to disable command prompt and batch files
or
DisableCMD dword 0x00000002 to disable command prompt but not batch files
If this setting is enabled and the user tries to start a registry editor, a message appears explaining that a setting prevents the action.
To prevent users from using other administrative tools, use the "Run only allowed Windows applications" setting.
START > RUN > GPEDIT.MSC > USER CONFIGURATION > ADMINISTRATIVE TEMPLATES > SYSTEM > FIND PREVENT ACCESS TO REGISTRY EDITING TOOLS > RIGHT CLICK > PROPERTIES > CLICK ENABLE > OK > REBOOT
Prevent Access to Command Prompt
This setting also determines whether batch files (.cmd and .bat) can run on the computer.
If you enable this setting and the user tries to open a command window, the system displays a message explaining that a setting prevents the action.
Note: Do not prevent the computer from running batch files if the computer uses logon, logoff, startup, or shutdown batch file scripts, or for users that use Terminal Services.
START > RUN > GPEDIT.MSC > USER CONFIGURATION > ADMINISTRATIVE TEMPLATES > SYSTEM > FIND PREVENT ACCESS TO THE COMMAND PROMPT > RIGHT CLICK > PROPERTIES > CLICK ENABLE > OK REBOOT
Note: This will disable the command for all users including the local administrator. If you want to disable this for specific users only (and for XP Home users) make the change in the registry. Login to the account you want to change and create the following registry entries:
HKEY_CURRENT_USER\Software\Policies\Microsoft\Windows\System\
DisableCMD dword 0x00000001 to disable command prompt and batch files
or
DisableCMD dword 0x00000002 to disable command prompt but not batch files
Getting More Processing Power and Increase speed by tweaking prefetcher settings
Getting More Processing Power
"In the Run box, type "Rundll32.exe advapi32.dll,ProcessIdleTasks". This frees up any idle tasks running in the background so that Windows XP can devote its full attention to what you want it to do. For example playing graphic intensive games."
While it DOES free up idle tasks, according to Microsoft, it can take up to 15 minutes to do so. You would not want to run this task before playing a game or using your machine as it will actually cause any tasks waiting for the system to become idle to be performed immediately.
Increase speed by tweaking prefetcher settings
1. run "regedit";
2. goto [HKEY_LOCAL_MACHINE\SYSTEM\CurrentControlSet\Control\Session Manager\Memory Management\PrefetchParameters\EnablePrefetcher];
3. Set the value to either 0-Disable, 1-App launch prefetch, 2-Boot Prefetch, 3-Both ("3" is recommended).
4. reboot.
It should decrease the boot time and the time it takes to load programs.
"In the Run box, type "Rundll32.exe advapi32.dll,ProcessIdleTasks". This frees up any idle tasks running in the background so that Windows XP can devote its full attention to what you want it to do. For example playing graphic intensive games."
While it DOES free up idle tasks, according to Microsoft, it can take up to 15 minutes to do so. You would not want to run this task before playing a game or using your machine as it will actually cause any tasks waiting for the system to become idle to be performed immediately.
Increase speed by tweaking prefetcher settings
1. run "regedit";
2. goto [HKEY_LOCAL_MACHINE\SYSTEM\CurrentControlSet\Control\Session Manager\Memory Management\PrefetchParameters\EnablePrefetcher];
3. Set the value to either 0-Disable, 1-App launch prefetch, 2-Boot Prefetch, 3-Both ("3" is recommended).
4. reboot.
It should decrease the boot time and the time it takes to load programs.
Speed up log in
First, if there are any other users on your computer see if they have a similarly long log-in. If they don't the problem might be your roaming profile, which is a folder where XP stores your settings you can access them from anywhere in the network. Since these profiles can get really bloated and are not really necessary unless you log-in from different computers in a large network, you should disable it. Here's how:
1. Right click on My Computer, select the Manage option.
2. From the Management Console, select the Local Users and Groups option.
3. Double-Click on the Users folder that appears on the right panel.
4. Right click on the account with the slow log-in and select Properties.
5. Click on the Profile tab of the Properties Window.
6. Erase(but keep note a not of this) whatever path appears for Profile Path under User Profile and Local Path under Home Folder: LEAVE THESE LINES BLANK.
7. Reboot. Try to log-in into the problematic account, you should see a significant speed-boost, the computer might warn you once or twice that your Roaming Profile is not available, ignore it and it will go away, good luck!
Note: You also will not have your settings and files that a roaming profile provides across a network.
1. Right click on My Computer, select the Manage option.
2. From the Management Console, select the Local Users and Groups option.
3. Double-Click on the Users folder that appears on the right panel.
4. Right click on the account with the slow log-in and select Properties.
5. Click on the Profile tab of the Properties Window.
6. Erase(but keep note a not of this) whatever path appears for Profile Path under User Profile and Local Path under Home Folder: LEAVE THESE LINES BLANK.
7. Reboot. Try to log-in into the problematic account, you should see a significant speed-boost, the computer might warn you once or twice that your Roaming Profile is not available, ignore it and it will go away, good luck!
Note: You also will not have your settings and files that a roaming profile provides across a network.
No more low disk space messages
go into registry with REGEDIT.EXE, go to
HKEY_CURRENT_USER\Software\Microsoft\Windows\CurrentVersion\Policies\Explorer\
and (if not already there) add DWORD (without quotes) "NoLowDiskSpaceChecks" and change the value to 1. Restart.
HKEY_CURRENT_USER\Software\Microsoft\Windows\CurrentVersion\Policies\Explorer\
and (if not already there) add DWORD (without quotes) "NoLowDiskSpaceChecks" and change the value to 1. Restart.
Clearing Google Internet Search History and Load Applications Faster
Clearing Google Internet Search History
Select "Internet Options" from the Internet Explorer "Tools" menu.
Select the "Content" tab at the top of the "Internet Options" window.
In the "Personal information" section at the bottom, click the "AutoComplete" button.
On the AutoComplete Settings window, click on the "Clear Forms" button.
You will get a window asking you to confirm clearing the history.
Click "OK", and you're done.
Load Applications Faster
1) Choose an application that you want to start up quicker.
2) Create a shortcut and place it on the desktop.
3) Right click the shortcut item and click properties.
4) In the target field you will have it pointing to the location of the application. For Example it will say "C:\Program Files\NetMeeting\conf.exe"
5) Add /prefetch:1 right after the last " marks in the target field. So you will have something that looks like this..
"C:\Program Files\NetMeeting\conf.exe" /prefetch:1
6) Amazingly the application will start up quicker. For some applications like Kazaa Lite and some other 3rd party applicatins, this tweak will not work. You will get an error messege if it doesn't work properly. If you get the error, just simply remove the /prefetch:1 from the target field of the shortcut and the original shortcut will work fine again.
Select "Internet Options" from the Internet Explorer "Tools" menu.
Select the "Content" tab at the top of the "Internet Options" window.
In the "Personal information" section at the bottom, click the "AutoComplete" button.
On the AutoComplete Settings window, click on the "Clear Forms" button.
You will get a window asking you to confirm clearing the history.
Click "OK", and you're done.
Load Applications Faster
1) Choose an application that you want to start up quicker.
2) Create a shortcut and place it on the desktop.
3) Right click the shortcut item and click properties.
4) In the target field you will have it pointing to the location of the application. For Example it will say "C:\Program Files\NetMeeting\conf.exe"
5) Add /prefetch:1 right after the last " marks in the target field. So you will have something that looks like this..
"C:\Program Files\NetMeeting\conf.exe" /prefetch:1
6) Amazingly the application will start up quicker. For some applications like Kazaa Lite and some other 3rd party applicatins, this tweak will not work. You will get an error messege if it doesn't work properly. If you get the error, just simply remove the /prefetch:1 from the target field of the shortcut and the original shortcut will work fine again.
10 tips for securing your computer
1. Update / patch ALL your software every now and then!
2. Check / adjust ALL your settings so they are safe, since they ARENT by default!
3. Use firewall, like ZoneAlarm!
4. Use good passwords: at least 13marks long, containing both letters and numbers. Remember to chance your password every few months atleast!
5. Get a good antivirus program: F-Secure or Norton Antivirus and keep it updated!
6. Don’t open or execute files that you are not 100% sure are absolutely safe nomatter where or how you get them.
7. Wipe your historyfiles (like cookies, internet history and temporary files, etc.), logs and personal files, with specific wiping program (like Eraser) instead of just deleting them.
8. Use encryption to enhance your privacy! Use encrypted email (like Hushmail or Ziplip) and encrypt sensitive files on your computer (PGP).
9. Don’t use public computers for anything you need to type in your logins, they usually have Trojan horses that capture your passwords.
10. Don’t assume anything. If you don’t know, find out! If you cant or don’t understand, ask someone who knows! There’s nothing more dangerous than doing something you don’t really know anything about. That’s the best way to cripple your system or get a Trojan horse on your computer!
2. Check / adjust ALL your settings so they are safe, since they ARENT by default!
3. Use firewall, like ZoneAlarm!
4. Use good passwords: at least 13marks long, containing both letters and numbers. Remember to chance your password every few months atleast!
5. Get a good antivirus program: F-Secure or Norton Antivirus and keep it updated!
6. Don’t open or execute files that you are not 100% sure are absolutely safe nomatter where or how you get them.
7. Wipe your historyfiles (like cookies, internet history and temporary files, etc.), logs and personal files, with specific wiping program (like Eraser) instead of just deleting them.
8. Use encryption to enhance your privacy! Use encrypted email (like Hushmail or Ziplip) and encrypt sensitive files on your computer (PGP).
9. Don’t use public computers for anything you need to type in your logins, they usually have Trojan horses that capture your passwords.
10. Don’t assume anything. If you don’t know, find out! If you cant or don’t understand, ask someone who knows! There’s nothing more dangerous than doing something you don’t really know anything about. That’s the best way to cripple your system or get a Trojan horse on your computer!
XP Stuffs
Desktop Gone Forever
If you can do without the regular NT 4.0 desktop permanently, it's possible to start with just the Task Manager even without Command Prompt. Launch the Registry Editor and locate HKEY_LOCAL_MACHINE/SOFTWARE/Microsoft/ CurrentVersion/WinLogon. Double-click on value named Shell (set by default to Explorer.exe). Enter Taskmgr.exe for the NT Task Manager. For a command prompt, enter Cmd.exe. Close the Registry Editor and log off.
Using the Windows Task Manager
Windows Task Manager can aid you in finding the amount of RAM you can regain by disabling unnecessary system services. Right-click on the taskbar and select Task Manager from the context menu. You can view the CPU usage and memory usage under the Performance tab, To regain resources, you can kill unnecessary processes from the Processes tab.
Fast Menus
You can change the Start menu delay in displaying sub-menus. Run Regedit adn navigate to HKEY_CURRENT_USER \Control Panel\Desktop. Change the value for MenuShowDelay to any number between 0 (fastest) and 4000 (slowest). If the above does not exist, add a string value with this name.
Launch Faster
You can change the default boot delay of 30 seconds. Open Control Panel > System > Startup/Shutdown. Under the Show List For, change the settings to the desired boot delay value. To bypass the boot menu altogether, set the delay to 0. Note: If you dual boot between the Operating Systems using the NT boot loader, do not set the boot delay value to 0.
Messing with Partitions
Before using Disk Administrator to make changes to the partitions, you may want to make sure you save your current configuration. To do this, click Start > Programs > Administrator tools > Disk Administrator > Partition > Configuration > Save. Insert a formatted floppy disk into your drive and click OK. You can restore the partition structure later by clicking on Partition > Configuration > Restore.
Performance Monitor
The Performance Monitor will not monitor disk performance unless you turn on the disk counters first. to do this, open the Command Prompt window and type diskperf -Y. r\Restart the computer. you can monitor disk activity with the Performance, you should turn them off by typing diskperd -N at the Command Prompt when you have finished testing.
Sharing Resources Secretly
To secretly share a resource, simple append a dollar sign ($) to share name. When you do so, the resource doesn't appear in Network Neighborhood, but is readily available by either mapping the drive or typing the UNC in the Run dialog box. This provides an additional degree of privacy and security to a shared resource. Further more, and access restrictions or passwords assigned to that shared resource remain in effect.
NT Protocol Analyser
NT server 4.0 includes a software-based protocol analyzer called the Network Monitor Agent. To install it open Control Panel > Network > Services and click on Add. Select Network Monitor Agent from the list. You can now start Network Monitor from the Administrative Tools. To capture network data, click on Capture > Start. Click Capture > Stop to stop monitoring.
Alerter and Messenger
If messages don't reach their destination's) when using "net send" command, turn on the Alerter and Messenger serviced in the Services applet of the Control Panel. also, make sure that the intended recipient is not logged in to multiple machines.
Adding a Command Prompt to any Folder
Open Explorer and click View > Options > File Types. Locate Folder and click Edit. Click New to open the New Action dialog box. Type Command Prompt in the Action box, and type cmd.exe in the Application Used to Perform Action box. Now you can right-click a folder and click Command Prompt to open a Command Prompt window at the folder's path.
AutoComplete
You can automatically fill in file and folder names at the command prompt, much like a UNIX terminal. Launch the Registry editor and move down to the HKEY_CURRENT_USER \Software\Microsoft\Command Processor. Select CompletionChar and set its value of to 9. Restart the system for the changes to take effect. Now, at the Command Prompt window, type in the first few characters of the file or folders and press Tab to complete it automatically.
Saving Recent Desktop Settings
To save the Desktop settings on normal exits only. You could lose your recent Desktop modifications if NT crashes or hangs. you can save your current Desktop settings by selecting and object on the Desktop and pressing F5 key.
Key to the CD Key
The CD Key is required to reinstall the operating system. If you have lost it, you can retrieve it form the Windows registry. Open Regedit and navigate to HKEY_LOCALMACHINE\SOFTWARE\Microsoft\WindowsNT \CurrentVersion. Look at ProductId. The CD Key is digits 6 thought 15.
The Bin is Full
To change the icons used for the Recycle bin, run the Registry Editor and navigate to HKEY_LOCAL_MACHINE\Software\Classes\CLSID\ {645F040-5081-101B-9F08-00AA002F954E}\DefaultIcon. Edit the value labeled Full and type the path to the icon file. Similarly, edit the value labeled Empty Empty to specify the icon for the empty recycle bin.
Compressing data
Windows NT lets you compress and decompress directories and files on NTFS partition. Compression reduces storage requirements for seldom-accessed files without degrading overall drive performance. You can compress and expand files and directories form My Computer or Explore - just right-click on item, select Properties and enable Compress form the list of attributes.
Drop and Run
You can open the Run dialog box (Start > Run), then drag and drop a file or application onto it form My Computer or Explorer. The compete pathname appears in the Run dialog box. Now you could add command-line options or simple click OK to launch the file.
Re-create NT installations disks
You can re-create NT installation disks if you lose or damage your original set. Format three floppy disks and load your 4.0 CD-ROM in the drive. Form the Run dialog box, browse to the i386 folder on the CD-ROM and select winnet32.exe and click Open. Alter the Run command like to d:\i386\winnt32/ox (where the first d is the CD-ROM drive letter). Click OK and follow the prompts.
List of settings and address
For a complete list of the settings and address currently assigned to your system, open the Command Prompt form the Start button's Program menu, and type ipconfig/all. this will display all TCP/IP relates settings on the system. This is similar to winipcfg in Windows 9x.
Easy addition of users
Creating a user template makes if easy to add multiple new users with the same group and access privileges. Open User Manager for Domains. Add a new user by selecting New User form the User menu. Label this user as a template for the user level, such as Template--Worker or Template--Secretary and set the correct privileges and options for Groups, Profile, and Dial-in. the next time you need to add a user, simple select the template account, and select User > Cope from the menu. All you need to do is changed the name and password.
Maintaining a Repair disk
The Emergency Repair Disk (ERD) holds a record of the settings and boot parameters for your primary partition Boot Sector. Every time you make a change to these areas, you should also re-crease the ERD; otherwise, the repair disk will not restore your system to the most recent functioning state. To crease an updated ERD, type rdisk /s in the Run dialog box.
Documentation Books on your hard drive
Wish to avoid inserting the NT CD-ROM every time you access Books Online? Simple cope the \Support\Books form the CD-ROM to your hard drive. Next, remove the disc form the drive and attempt to launch the Books Online Shortcut. When you're prompted to insert the CD-ROM or specify an alternate route, click the Browse button, and select the directory where you copied the files.
Restoring a damaged boot sector
An up-to-date Emergency Repair Disk (ERD) can aid you in recovering from a damaged boot sector. To restore a damaged boot sector, reboot the computer using the Setup disk 1, followed by disk 2 when prompted. Select R for Repair. Form the next menu, select only Inspect boot sector (to check the boot sector for damaged). Insert disk 3 and then the ERD when prompted and follow the instructions on screen.
If you can do without the regular NT 4.0 desktop permanently, it's possible to start with just the Task Manager even without Command Prompt. Launch the Registry Editor and locate HKEY_LOCAL_MACHINE/SOFTWARE/Microsoft/ CurrentVersion/WinLogon. Double-click on value named Shell (set by default to Explorer.exe). Enter Taskmgr.exe for the NT Task Manager. For a command prompt, enter Cmd.exe. Close the Registry Editor and log off.
Using the Windows Task Manager
Windows Task Manager can aid you in finding the amount of RAM you can regain by disabling unnecessary system services. Right-click on the taskbar and select Task Manager from the context menu. You can view the CPU usage and memory usage under the Performance tab, To regain resources, you can kill unnecessary processes from the Processes tab.
Fast Menus
You can change the Start menu delay in displaying sub-menus. Run Regedit adn navigate to HKEY_CURRENT_USER \Control Panel\Desktop. Change the value for MenuShowDelay to any number between 0 (fastest) and 4000 (slowest). If the above does not exist, add a string value with this name.
Launch Faster
You can change the default boot delay of 30 seconds. Open Control Panel > System > Startup/Shutdown. Under the Show List For, change the settings to the desired boot delay value. To bypass the boot menu altogether, set the delay to 0. Note: If you dual boot between the Operating Systems using the NT boot loader, do not set the boot delay value to 0.
Messing with Partitions
Before using Disk Administrator to make changes to the partitions, you may want to make sure you save your current configuration. To do this, click Start > Programs > Administrator tools > Disk Administrator > Partition > Configuration > Save. Insert a formatted floppy disk into your drive and click OK. You can restore the partition structure later by clicking on Partition > Configuration > Restore.
Performance Monitor
The Performance Monitor will not monitor disk performance unless you turn on the disk counters first. to do this, open the Command Prompt window and type diskperf -Y. r\Restart the computer. you can monitor disk activity with the Performance, you should turn them off by typing diskperd -N at the Command Prompt when you have finished testing.
Sharing Resources Secretly
To secretly share a resource, simple append a dollar sign ($) to share name. When you do so, the resource doesn't appear in Network Neighborhood, but is readily available by either mapping the drive or typing the UNC in the Run dialog box. This provides an additional degree of privacy and security to a shared resource. Further more, and access restrictions or passwords assigned to that shared resource remain in effect.
NT Protocol Analyser
NT server 4.0 includes a software-based protocol analyzer called the Network Monitor Agent. To install it open Control Panel > Network > Services and click on Add. Select Network Monitor Agent from the list. You can now start Network Monitor from the Administrative Tools. To capture network data, click on Capture > Start. Click Capture > Stop to stop monitoring.
Alerter and Messenger
If messages don't reach their destination's) when using "net send" command, turn on the Alerter and Messenger serviced in the Services applet of the Control Panel. also, make sure that the intended recipient is not logged in to multiple machines.
Adding a Command Prompt to any Folder
Open Explorer and click View > Options > File Types. Locate Folder and click Edit. Click New to open the New Action dialog box. Type Command Prompt in the Action box, and type cmd.exe in the Application Used to Perform Action box. Now you can right-click a folder and click Command Prompt to open a Command Prompt window at the folder's path.
AutoComplete
You can automatically fill in file and folder names at the command prompt, much like a UNIX terminal. Launch the Registry editor and move down to the HKEY_CURRENT_USER \Software\Microsoft\Command Processor. Select CompletionChar and set its value of to 9. Restart the system for the changes to take effect. Now, at the Command Prompt window, type in the first few characters of the file or folders and press Tab to complete it automatically.
Saving Recent Desktop Settings
To save the Desktop settings on normal exits only. You could lose your recent Desktop modifications if NT crashes or hangs. you can save your current Desktop settings by selecting and object on the Desktop and pressing F5 key.
Key to the CD Key
The CD Key is required to reinstall the operating system. If you have lost it, you can retrieve it form the Windows registry. Open Regedit and navigate to HKEY_LOCALMACHINE\SOFTWARE\Microsoft\WindowsNT \CurrentVersion. Look at ProductId. The CD Key is digits 6 thought 15.
The Bin is Full
To change the icons used for the Recycle bin, run the Registry Editor and navigate to HKEY_LOCAL_MACHINE\Software\Classes\CLSID\ {645F040-5081-101B-9F08-00AA002F954E}\DefaultIcon. Edit the value labeled Full and type the path to the icon file. Similarly, edit the value labeled Empty Empty to specify the icon for the empty recycle bin.
Compressing data
Windows NT lets you compress and decompress directories and files on NTFS partition. Compression reduces storage requirements for seldom-accessed files without degrading overall drive performance. You can compress and expand files and directories form My Computer or Explore - just right-click on item, select Properties and enable Compress form the list of attributes.
Drop and Run
You can open the Run dialog box (Start > Run), then drag and drop a file or application onto it form My Computer or Explorer. The compete pathname appears in the Run dialog box. Now you could add command-line options or simple click OK to launch the file.
Re-create NT installations disks
You can re-create NT installation disks if you lose or damage your original set. Format three floppy disks and load your 4.0 CD-ROM in the drive. Form the Run dialog box, browse to the i386 folder on the CD-ROM and select winnet32.exe and click Open. Alter the Run command like to d:\i386\winnt32/ox (where the first d is the CD-ROM drive letter). Click OK and follow the prompts.
List of settings and address
For a complete list of the settings and address currently assigned to your system, open the Command Prompt form the Start button's Program menu, and type ipconfig/all. this will display all TCP/IP relates settings on the system. This is similar to winipcfg in Windows 9x.
Easy addition of users
Creating a user template makes if easy to add multiple new users with the same group and access privileges. Open User Manager for Domains. Add a new user by selecting New User form the User menu. Label this user as a template for the user level, such as Template--Worker or Template--Secretary and set the correct privileges and options for Groups, Profile, and Dial-in. the next time you need to add a user, simple select the template account, and select User > Cope from the menu. All you need to do is changed the name and password.
Maintaining a Repair disk
The Emergency Repair Disk (ERD) holds a record of the settings and boot parameters for your primary partition Boot Sector. Every time you make a change to these areas, you should also re-crease the ERD; otherwise, the repair disk will not restore your system to the most recent functioning state. To crease an updated ERD, type rdisk /s in the Run dialog box.
Documentation Books on your hard drive
Wish to avoid inserting the NT CD-ROM every time you access Books Online? Simple cope the \Support\Books form the CD-ROM to your hard drive. Next, remove the disc form the drive and attempt to launch the Books Online Shortcut. When you're prompted to insert the CD-ROM or specify an alternate route, click the Browse button, and select the directory where you copied the files.
Restoring a damaged boot sector
An up-to-date Emergency Repair Disk (ERD) can aid you in recovering from a damaged boot sector. To restore a damaged boot sector, reboot the computer using the Setup disk 1, followed by disk 2 when prompted. Select R for Repair. Form the next menu, select only Inspect boot sector (to check the boot sector for damaged). Insert disk 3 and then the ERD when prompted and follow the instructions on screen.
Disable the Turn off computer button on the Welcome screen
By default, the Microsoft Windows XP logon screen displays a Turn off computer button. This display seems convenient, until one of your kids happens to shut down your computer and close all your programs. To prevent this from happening, you can disable the Turn off computer button. You can still shut down your computer; you just have to log on with a computer administrator account first.
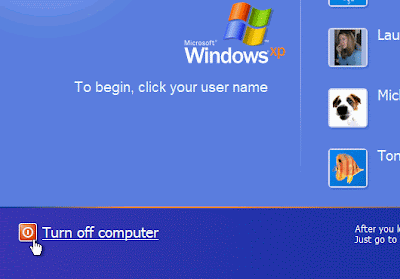
To disable the Turn off computer button on the Welcome screen
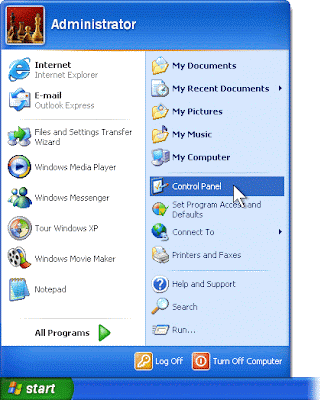
1.
Log on to your computer as an administrator. Click Start, and then click Control Panel.
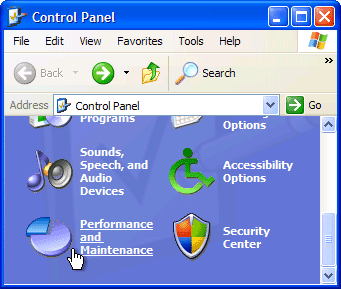
2.
Click Performance and Maintenance
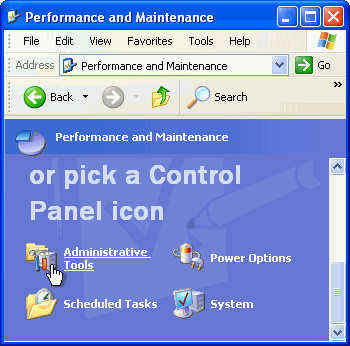
3.
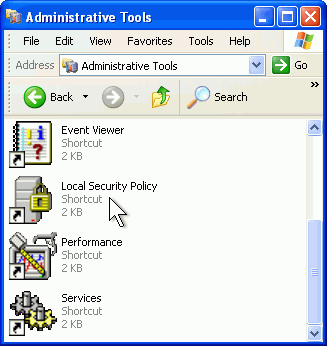
Click Administrative Tools..
4.
Double-click Local Security Policy.
5.
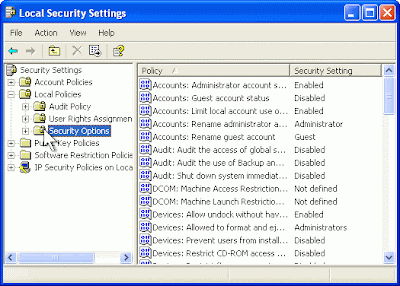
Expand Local Policies by clicking the plus sign next to it, and then click Security Options.
6.
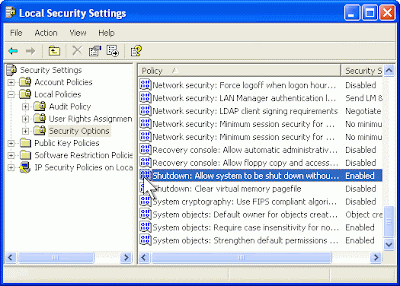
In the right pane, double-click the Shutdown: Allow system to be shut down without having to log on policy.
7.
Click Disabled, and then click OK.
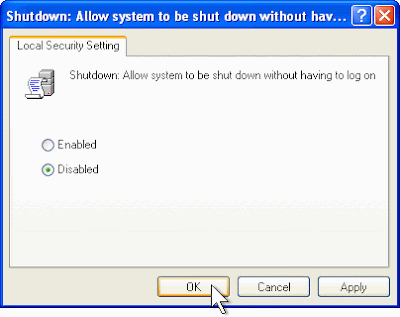
Windows XP removes the Turn off computer button from the Welcome screen—so no more shutting down without logging on!

To disable the Turn off computer button on the Welcome screen
1.
Log on to your computer as an administrator. Click Start, and then click Control Panel.

2.
Click Performance and Maintenance

3.
Click Administrative Tools..

4.
Double-click Local Security Policy.

5.
Expand Local Policies by clicking the plus sign next to it, and then click Security Options.

6.
In the right pane, double-click the Shutdown: Allow system to be shut down without having to log on policy.

7.
Click Disabled, and then click OK.

Windows XP removes the Turn off computer button from the Welcome screen—so no more shutting down without logging on!
Change the default folder opened in Windows Explorer
Microsoft Windows Explorer, which is accessible through the Start menu, is the tool you use to look through the files and drives on your computer.
When you start Windows Explorer from the Start menu, it opens your My Documents folder by default. However, a My Documents shortcut already exists on your Start menu. You can put the Windows Explorer shortcut to better use by changing it to display all top-level drives and folders on your system. This change will give you a broad, overall view of all your folders and files.
To change how Windows Explorer opens
1.
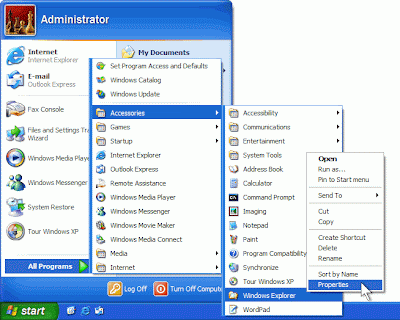
Click Start, point to All Programs, point to Accessories, right-click Windows Explorer, and then click Properties
2.
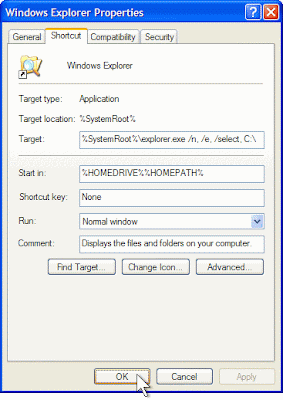
The Target box currently shows %SystemRoot%\explorer.exe
At the end of the line, type the characters /n, /e, /select, C:\
The line should now read %SystemRoot%\explorer.exe /n, /e, /select, C:\
Be sure you insert blank spaces in the correct locations. Then, click OK.
Now, when you open Windows Explorer, it will display all of your folders and drives, not just your My Documents folder.
When you start Windows Explorer from the Start menu, it opens your My Documents folder by default. However, a My Documents shortcut already exists on your Start menu. You can put the Windows Explorer shortcut to better use by changing it to display all top-level drives and folders on your system. This change will give you a broad, overall view of all your folders and files.
To change how Windows Explorer opens
1.
Click Start, point to All Programs, point to Accessories, right-click Windows Explorer, and then click Properties

2.
The Target box currently shows %SystemRoot%\explorer.exe
At the end of the line, type the characters /n, /e, /select, C:\
The line should now read %SystemRoot%\explorer.exe /n, /e, /select, C:\
Be sure you insert blank spaces in the correct locations. Then, click OK.

Now, when you open Windows Explorer, it will display all of your folders and drives, not just your My Documents folder.
Speed up menu display
Microsoft Windows XP uses many visual effects to provide a rich, friendly interface. One of these settings allows menus to fade into view when you open them. This visual effect is so smooth that you may never have noticed it; however, the effect does cause menus to take a little longer to appear.
On a fast computer, this shouldn't be an issue. But on a computer that isn’t responding as quickly as you'd like, you can make menus display faster.
To speed up menu display
1.
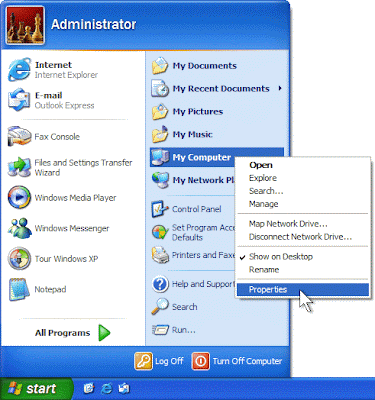
Click Start. Right-click My Computer, and then click Properties.
2.
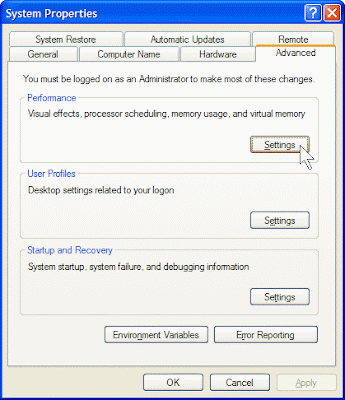
Click the Advanced tab. In the Performance area, click Settings.
3.
On the Visual Effects tab in the Performance Options dialog box, clear the Fade or slide menus into view check box.
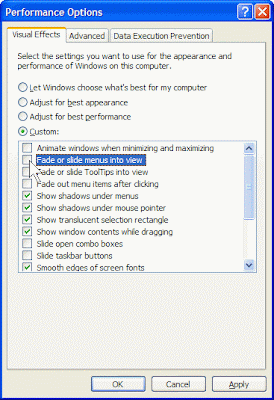
4.
Click OK.
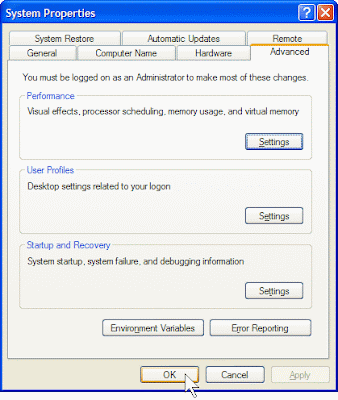
5.
In the System Properties dialog box, click OK.
Now when you click a menu, it will appear almost instantly.
On a fast computer, this shouldn't be an issue. But on a computer that isn’t responding as quickly as you'd like, you can make menus display faster.
To speed up menu display
1.
Click Start. Right-click My Computer, and then click Properties.

2.
Click the Advanced tab. In the Performance area, click Settings.

3.
On the Visual Effects tab in the Performance Options dialog box, clear the Fade or slide menus into view check box.

4.
Click OK.

5.
In the System Properties dialog box, click OK.
Now when you click a menu, it will appear almost instantly.
Set your windows so they all have the same view
Microsoft Windows XP lets you show the contents of folders in a variety of ways, such as a simple or detailed list of the files, or as thumbnail images. Each folder in My Computer or My Documents can have its own view. That’s useful for folders like My Music or My Pictures, because you can look at your digital photos in Thumbnails or Filmstrip view, and see your song titles in Tiles view. But changing the view for every folder can be time-consuming.
If you prefer to have all your folder contents displayed in a particular way, you can save yourself some time by changing the view for all the folders on your computer at once.
To set your windows so they all have the same view
1.
Click Start, and then click My Documents.
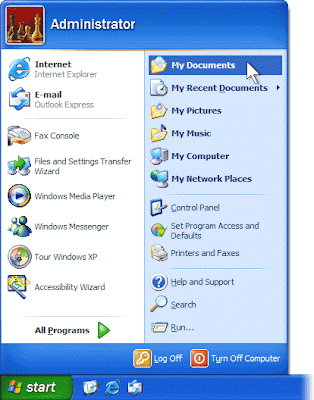
3.
Click Tools, and then click Folder Options.
2.
Click the Views button, and then click the view you want to apply to all folders.
Note: For more information about views
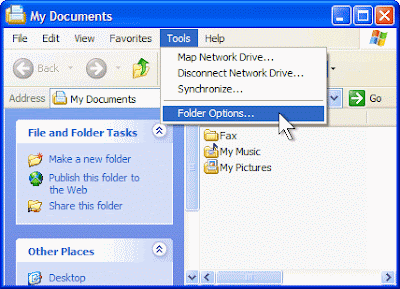
4. Click the View tab, and then click Apply to All Folders.
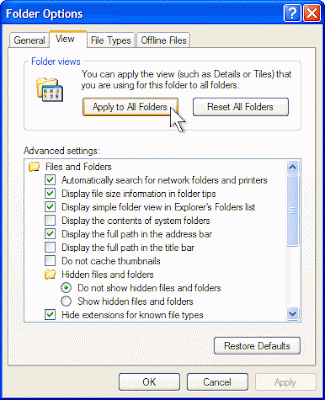
Now all your Windows will have the same View
If you prefer to have all your folder contents displayed in a particular way, you can save yourself some time by changing the view for all the folders on your computer at once.
To set your windows so they all have the same view
1.
Click Start, and then click My Documents.

3.
Click Tools, and then click Folder Options.
2.
Click the Views button, and then click the view you want to apply to all folders.
Note: For more information about views

4. Click the View tab, and then click Apply to All Folders.

Now all your Windows will have the same View
Key Board Short Cuts
The mouse, one of the greatest advances in computing history, provides you with an intuitive point-and-click method for using your computer. Depending on the type of work you're doing, however, sometimes using a mouse actually slows you down. If you are a good typist, taking your hands away from the keyboard to move the mouse can use up a few seconds. Over the course of a full day, you could save several minutes by using keyboard shortcuts instead of the mouse.
You can use your keyboard instead of your mouse to do these three tasks:
• Start a program
• Navigate menus
• Minimize, maximize, and close windows
Start a program using a keyboard shortcut
The Start menu is great for finding programs, but its multiple levels of folders can be time consuming to navigate. If there is a program you start frequently, you should set a keyboard shortcut for it so that you can start the program without taking your hands off the keyboard.
To set a keyboard shortcut to start a program
1.
Click the Start menu, and then click All Programs. Right-click the program that you want to start with a keyboard shortcut, and then click Properties.
You can use your keyboard instead of your mouse to do these three tasks:
• Start a program
• Navigate menus
• Minimize, maximize, and close windows
Start a program using a keyboard shortcut
The Start menu is great for finding programs, but its multiple levels of folders can be time consuming to navigate. If there is a program you start frequently, you should set a keyboard shortcut for it so that you can start the program without taking your hands off the keyboard.
To set a keyboard shortcut to start a program
1.
Click the Start menu, and then click All Programs. Right-click the program that you want to start with a keyboard shortcut, and then click Properties.

2.
Click in the Shortcut key box. Now press the letter on your keyboard that you want to use to start the program. Make it easy to remember—for example, press I for Microsoft Internet Explorer.
Note: You can use either uppercase or lowercase letters when creating your keyboard shortcuts—and when accessing them later. In the Shortcut key box, Microsoft Windows XP automatically adds Ctrl + Alt + before the key you pressed. When you want to start the program, hold down both the CTRL and ALT keys simultaneously, while also pressing the letter you chose. This way, your program won't start every time you type that letter.

3.
Click OK.

4.
Now test your shortcut. Hold down the CTRL and ALT keys, and then press the letter you chose. If you find it difficult to hold down two keys at once, Your program should start.

Navigate menus using the keyboard
You can speed up tasks in almost any program by choosing menu items using your keyboard instead of your mouse. This operation is particularly handy when you're performing repetitive tasks.
To control menus using your keyboard
1.
With your program open, press the ALT key. Notice that one letter on each menu name is now underlined. To open the menu, press the underlined key. For example, in Internet Explorer, the View menu name shows the V underlined after you press the ALT key. To open the View menu, press the ALT key, and then press V.
2.
Now, each menu item will show one letter underlined. To access or activate the menu item you want, simply press the underlined key. For example, in Internet Explorer, after you open the View menu, the Privacy Report menu item shows the V underlined. Instead of clicking Privacy Report with your mouse, you can just press the V key.
3.
You can also choose menu commands by pressing key sequences quickly, without waiting for the menus to open. For example, to quickly view a Web page's privacy report in Internet Explorer, press ALT, V, V. Similarly, to save a Web page in Internet Explorer, you would normally click the File menu, and then click Save As. To choose the same commands using your keyboard, press ALT, F, A.
Control windows using your keyboard
If you like to keep four or five windows open while you work (or play) on your computer, you'll appreciate knowing these keyboard shortcuts. You can quickly switch between your Web browser, e-mail, instant message windows, and other programs without taking your hands off the keyboard.
Action
Shortcut
Minimize a window to your taskbar
ALT, SPACEBAR, N
Maximize a window so it takes up your whole desktop
ALT, SPACEBAR, X
Restore a window so it's visible but doesn't take up your whole desktop
ALT, SPACEBAR, R
Close a window
ALT+F4
Switch to the last window you had open
ALT+TAB
Switch to any window
Hold down the ALT key, and press TAB until the window you want is active
Programs often start up in a "restored" state, where the window takes up only part of the screen. To maximize the window so that it takes up the entire screen, press the ALT key, press the SPACEBAR, and then press X. This will feel natural after you do it a few times, and you will feel much more efficient while using your computer.
Tuesday, October 7, 2008
156 Useful Run Commands
GO to RUN and enter these commands
scroll down
if wrong please let me know .
scroll down
To Access…. | Run Command |
Accessibility Controls | access.cpl |
Accessibility Wizard | accwiz |
Add Hardware Wizard | hdwwiz.cpl |
Add/Remove Programs | appwiz.cpl |
Administrative Tools | control admintools |
Adobe Acrobat (if installed) | AcroRd32.exe |
Adobe Designer (if installed) | acrodist |
Adobe Distiller (if installed) | acrodist |
Adobe ImageReady (if installed) | imageready |
Adobe Photoshop (if installed) | photoshop |
Automatic Updates | wuaucpl.cpl |
Bluetooth Transfer Wizard | fsquirt |
Calculator | calc |
Certificate Manager | certmgr.msc |
Character Map | charmap |
Check Disk Utility | chkdsk |
Clipboard Viewer | clipbrd |
Command Prompt | cmd |
Component Services | dcomcnfg |
Computer Management | compmgmt.msc |
Control Panel | control |
Date and Time Properties | timedate.cpl |
DDE Shares | ddeshare |
Device Manager | devmgmt.msc |
Direct X Control Panel (If Installed)* | directx.cpl |
Direct X Troubleshooter | dxdiag |
Disk Cleanup Utility | cleanmgr |
Disk Defragment | dfrg.msc |
Disk Management | diskmgmt.msc |
Disk Partition Manager | diskpart |
Display Properties | control desktop |
Display Properties | desk.cpl |
Display Properties (w/Appearance Tab Preselected) | control color |
Dr. Watson System Troubleshooting Utility | drwtsn32 |
Driver Verifier Utility | verifier |
Event Viewer | eventvwr.msc |
Files and Settings Transfer Tool | migwiz |
File Signature Verification Tool | sigverif |
Findfast | findfast.cpl |
Firefox (if installed) | firefox |
Folders Properties | control folders |
Fonts | control fonts |
Fonts Folder | fonts |
Free Cell Card Game | freecell |
Game Controllers | joy.cpl |
Group Policy Editor (XP Prof) | gpedit.msc |
Hearts Card Game | mshearts |
Help and Support | helpctr |
HyperTerminal | hypertrm |
Iexpress Wizard | iexpress |
Indexing Service | ciadv.msc |
Internet Connection Wizard | icwconn1 |
Internet Explorer | iexplore |
Internet Properties | inetcpl.cpl |
Internet Setup Wizard | inetwiz |
IP Configuration (Display Connection Configuration) | ipconfig /all |
IP Configuration (Display DNS Cache Contents) | ipconfig / displaydns |
IP Configuration (Delete DNS Cache Contents) | ipconfig / flushdns |
IP Configuration (Release All Connections) | ipconfig /release |
IP Configuration (Renew All Connections) | ipconfig /renew |
IP Configuration (Refreshes DHCP & Re-Registers DNS) | ipconfig / registerdns |
IP Configuration (Display DHCP Class ID) | ipconfig / showclassid |
IP Configuration (Modifies DHCP Class ID) | ipconfig / setclassid |
Java Control Panel (If Installed) | jpicpl32.cpl |
Java Control Panel (If Installed) | javaws |
Keyboard Properties | control keyboard |
Local Security Settings | secpol.msc |
Local Users and Groups | lusrmgr.msc |
Logs You Out Of Windows | logoff |
Malicious Software Removal Tool | mrt |
Microsoft Access (if installed) | access.cpl |
Microsoft Chat | winchat |
Microsoft Excel (if installed) | excel |
Microsoft Frontpage (if installed) | frontpg |
Microsoft Movie Maker | moviemk |
Microsoft Paint | mspaint |
Microsoft Powerpoint (if installed) | powerpnt |
Microsoft Word (if installed) | winword |
Microsoft Syncronization Tool | mobsync |
Minesweeper Game | winmine |
Mouse Properties | control mouse |
Mouse Properties | main.cpl |
Nero (if installed) | nero |
Netmeeting | conf |
Network Connections | control netconnections |
Network Connections | ncpa.cpl |
Network Setup Wizard | netsetup.cpl |
Notepad | notepad |
Nview Desktop Manager (If Installed) | nvtuicpl.cpl |
Object Packager | packager |
ODBC Data Source Administrator | odbccp32.cpl |
On Screen Keyboard | osk |
Opens AC3 Filter (If Installed) | ac3filter.cpl |
Outlook Express | msimn |
Paint | pbrush |
Password Properties | password.cpl |
Performance Monitor | perfmon.msc |
Performance Monitor | perfmon |
Phone and Modem Options | telephon.cpl |
Phone Dialer | dialer |
Pinball Game | pinball |
Power Configuration | powercfg.cpl |
Printers and Faxes | control printers |
Printers Folder | printers |
Private Character Editor | eudcedit |
Quicktime (If Installed) | QuickTime.cpl |
Quicktime Player (if installed) | quicktimeplayer |
Real Player (if installed) | realplay |
Regional Settings | intl.cpl |
Registry Editor | regedit |
Registry Editor | regedit32 |
Remote Access Phonebook | rasphone |
Remote Desktop | mstsc |
Removable Storage | ntmsmgr.msc |
Removable Storage Operator Requests | ntmsoprq.msc |
Resultant Set of Policy (XP Prof) | rsop.msc |
Scanners and Cameras | sticpl.cpl |
Scheduled Tasks | control schedtasks |
>Security | wscui.cpl |
Services | services.msc |
Shared Folders | fsmgmt.msc |
Shuts Down Windows | shutdown |
Sounds and Audio | mmsys.cpl |
Spider Solitare Card Game | spider |
SQL Client Configuration | cliconfg |
System Configuration Editor | sysedit |
System Configuration Utility | msconfig |
System File Checker Utility (Scan Immediately) | sfc / scannow |
System File Checker Utility (Scan Once At Next Boot) | sfc / scanonce |
System File Checker Utility (Scan On Every Boot) | sfc / scanboot |
System File Checker Utility (Return to Default Setting) | sfc /revert |
System File Checker Utility (Purge File Cache) | sfc / purgecache |
System File Checker Utility (Set Cache Size to size x) | sfc / cachesize=x |
System Information | msinfo32 |
System Properties | sysdm.cpl |
Task Manager | taskmgr |
TCP Tester | tcptest |
Telnet Client | telnet |
Tweak UI (if installed) | tweakui |
User Account Management | nusrmgr.cpl |
Utility Manager | utilman |
Windows Address Book | wab |
Windows Address Book Import Utility | wabmig |
Windows Backup Utility (if installed) | ntbackup |
Windows Explorer | explorer |
Windows Firewall | firewall.cpl |
Windows Magnifier | magnify |
Windows Management Infrastructure | wmimgmt.msc |
Windows Media Player | wmplayer |
Windows Messenger | msmsgs |
Windows Picture Import Wizard (need camera connected) | wiaacmgr |
Windows System Security Tool | syskey |
Windows Update Launches | wupdmgr |
Windows Version (to show which version of windows) | winver |
Windows XP Tour Wizard | tourstart |
Wordpad | write |
if wrong please let me know .
Secure your Data
I think you may be familiar with lot of stuffs to secure your data
Most of us know how to secure our Desktop or laptop with a Bios password or a Windows user log on password.
But if you wish to give a Triple protection to you system try this
The first 2 protection is by assigning a Bios boot up password and setting a password for your User accounts.
If you wish to set a security between these process ie after XP is loaded and before your User account login screen is Shown Try this
Go to Run (Windows Key +R) type syskey and press Enter ,you will get a window like

Click Update then another window will pop up

usually the system Generated password with Store start up key Locally will be enabled so that your system will not ask any password while start up . I f you wish to set a password You have 2 choices one by assigning a password manually or allowing system to keep a password in your Floppy disk . To keep manually select password start up option and assign a password , if u need the system to set the password , insert a floppy disk in the floppy disk drive and select store password on floppy disk . After that Click OK so from now you will be asked to enter a password while xp is loaded .
If you wish to remove password follow the same procedure and select store password locally and press OK .
Subscribe to:
Posts (Atom)