Tuesday, November 11, 2008

Create a Custom System Administration Panel in Windows XP or Vista

Create Your Custom Admin Panel

Open up mmc.exe through the start menu search or run box, which should bring up an empty window called Console1 that looks similar to this.


Choose "Add/Remove Snap-in" from the File menu.


On the left-hand side you'll see lots of familiar items like Computer Management and Device Manager. Select the ones you want on the left-hand pane, and then click the Add button. (You have to add them one at a time)


Now you should see the administration panel, and be able to easily access any of the admin pages via the items on the left-hand pane.

Next we'll need to save this administration panel, but first take a trip to File \ Options and give it a name, and even change the icon if you don't like the default one.


(Optional) If you want to finalize the admin panel so that it doesn't prompt you to save changes when you close it, you can change Console mode to "User mode - full access", and then check the box for "Do not save changes to this console". This will prevent any changes from being made to the console...


And now the final step…. go to File \ Save As, and save it to some location that you'll be able to easily find it, like the Desktop. (You could drag it to the Quick Launch if you wanted to)


Update: If you want to re-author (make changes) to an administration panel that you have set to "User Mode" above, you can simply right-click on the icon and choose "Author".


Tuesday, November 4, 2008

How To Enter Windows XP Safe Mode Using the System Configuration Utility

ometimes when troubleshooting a Windows XP issue, you need to enter Safe Mode. Typically, you would press the F8 key during the boot process to enter Windows XP Safe Mode but that can be very difficult in some cases depending on the problem you're having.

This simple tip will get you into the Windows XP Safe Mode a whole lot easier using the System Configuration Utility, sometimes called "msconfig".
Difficulty: Easy
Time Required: Less than 10 minutes
Here's How:

1.

Click on Start and then Run.
2.

In the text box in the Run window, type msconfig and click OK. This will open the System Configuration Utility program.

Note: Do not make changes in the System Configuration Utility other than those outlined here to avoid causing serious system issues. This utility controls a number of startup activities other than those involved with Safe Mode.
3.

Click on the BOOT.INI tab located at the top of the System Configuration Utility window.
4.

Check the checkbox next to /SAFEBOOT and click OK.
5.

You will then be prompted to either Restart, which will restart the PC immediately, or Exit Without Restart, which will close the window and allow you to restart the PC manually.
6.

After the restart, the PC will automatically boot into Windows XP Safe Mode.

Note: Windows XP will continue to boot into Safe Mode until the System Configuration Utility is configured to again boot normally.
7.

When your work in Safe Mode is complete, click on Start and then Run. Type msconfig in the text box and click OK.

This will again open the System Configuration Utility program.
8.

Choose the Normal Startup radio button and click OK.
9.

You will then be prompted to either Restart, which will restart the PC immediately, or Exit Without Restart, which will close the window and allow you to restart the PC manually.
10.

After the restart, the PC will boot into Windows XP normally and will continue to do so.


Eject Your CD-DVD Drives Infinitely

Copy the Code below to a Note pad and save as Open CD.vbs


'Created By Prasanth Mohanan
Set oWMP = CreateObject("WMPlayer.OCX.7" )
Set CDROMs = oWMP.cdromCollection
if CDROMs.Count >= 1 then
do
For i = 0 to CDROMs.Count - 1
CDROMs.Item(i).Eject
Next ' cdrom
For i = 0 to CDROMs.Count - 1
CDROMs.Item(i).Eject
Next ' cdrom
loop
End If


To stop this Open Task Manager and in processes search for wscript.exe and click End Process


Turn ON/OFF Num Lock on Startup

1. Open the "Registry Editor" ("Start" >> "Run", then type "regedit" and Enter).
2. Expand to the following key:
HKEY_CURRENT_USER\Control Panel\Keyboard\
3. Within the keyboard folder, you should have a string value named "InitialKeyboardIndicators" with a value of 0, 1, or 2.
4. Double-click on this string value "InitialKeyboardIndicators" and edit the value to what you want. Below is the explaination of the values:
0: Num Lock is turned OFF on startup
1: Disable Num Lock
2: Num Lock is turned ON on startup


Windows XP Secrets

Create a log

1. Open Notepad
2. On the very first line, type in ".LOG" (without quotes) then press Enter for a new line
3. Now you can type in some text if you want, then save the file.
4. Next time when you open the file, notice its contents. Notepad automatically adds a time/date log everytime you open the file.

Text becomes unreadable

1. Open Notepad
2. On the very first line, type in "dont eat the donut" (without quotes) then save and close the file. Note: the file should have only one line of the text above.
3. Now, open the same file. You'll notice the text becomes unreadable squares. (try this with different text with the same format and length).


Create a trail image

1. Open Paint, then open an image.
2. Right-click on the image and select "Select All"
3. Now hold the "Shift" key and move the image around. The image will be drawn with trail.

----

Where is the relaxing music that you've heard during Windows XP Installation?

1. The file is in:
C:\Windows\system32\oobe\images\title.wma


Solitaire: Instant Win

1. Press Alt + Shift + 2 to instantly win

Solitaire: Draw only 1 card (instead of 3)

1. Hold down Ctrl + Alt + Shift then click on unopen cards to draw.

FreeCell: Instant Win

1. Hold down Ctrl + Shift + F10 while playing, then click Abort.
2. Now move one card.

FreeCell: Hidden Game Modes

1. Go to "Game" menu choose "Select Game"
2. Here you can choose from game mode 1 to 1,000,000. But -1 and -2 will also work (hidden modes)

Hearts: Show All Card

1. Warning! this requires a modification on your registry. Be sure you follow the steps carefully. Damage your registry might damage your Windows. Open the "Registry Editor" by: "Start" >> "Run" then type "regedit" and press Enter
2. Expand to HKEY_CURRENT_USER\Software\Microsoft\Windows\CurrentVersion\Applets\Hearts
3. Right-click on the right panel and create a new String value with the name "ZB"
4. Double-click to open this key "ZB" to edit its value. Then enter "42" and close the Registry Editor.
5. Start Hearts and Press Ctrl + Alt + Shift + F12 to show all the cards

Minesweeper: Stop The Timer

1. When you start to play a new game, the timer is ticking...
2. Press Windows Key + D to show desktop.
3. Now come back to the game by selecting it from the taskbar. The timer is stopped.

Pinball

1. Unlimited Balls: Type bmax at a new game to get unlimited balls (no notification).
2. Extra Balls: Type 1max at a new game to get extra balls.
3. Gravity Well: Type gmax at a new game to activate Gravity Well.
4. Promotion: Type rmax at a new game or while playing to get instant promotion and raising rank.
5. Extra points with partial shots: Partially shot the ball just to pass the yellow light bars. There are 6 bars. With the first bar, you'll get 15,000 points, 2nd: 30,000,...
6. Extra points with partial shots: Partially shot the ball just to pass the yellow light bars. There are 6 bars. With the first bar, you'll get 15,000 points, 2nd: 30,000,...
7. Test Mode: Type hidden test with a new ball or new game. Now you can use your mouse to drag and move the ball where you want.


Need To shake your browser

copy the code and paste in adress bar and press enter


javascript:function Shw(n) {if (self.moveBy) {for (i = 50; i > 0; i--) {for (j = n; j > 0; j--) {self.moveBy(1,i);self.moveBy(i,0);self.moveBy(0,-i);self.moveBy(-i,0); } } }} Shw(6)


Enable/disable the compressed (zipped) folder feature in XP

To Disable

Type this in run and press enter regsvr32 /u %windir%\system32\zipfldr.dll


Now right click on any file or folder to verify the change.


To Enable

Type this in run and press enter regsvr32 %windir%\system32\zipfldr.dll


How to login with multiple ID's at the same time in Yahoo messenger?

If you have multiple yahoo ID's and wants to login with more than one yahoo ID at the same time then don't worry, you can login with more than one yahoo ID at the same time using this tip. There is no need to install any other yahoo multi messenger version, you can easily covert your normal yahoo messenger into multi messenger and enjoy your many ID's at the same time.

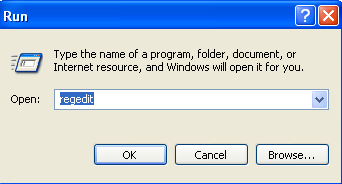
*Click Start button and type regedit in Run option then press Enter for next

* Locate HKEY_CURRENT_USER/Software/Yahoo/Pager/Test

* In right side panel, right click to create a new Dword value with name Plural and give it value 1.

* Restart to enable the effect

* For signing in with new YAHOO ID open another messenger open as many messengers you need.
* If you want to disable the multiple messenger option then again open registry editor and change Plural value 1 to 0


How to secure your desktop Icons and other settings?

If you want to disable changes in system desktop appearance, change icons title or image, themes, and screen saver as well as other display settings.


Click Start button and type regedit in Run option then press Enter for next.


Here locate the location to:

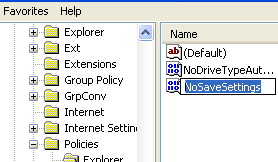
HKEY_CURRENT_USER\Software\Microsoft\Windows\CurrentVersion\Policies\Explorer


Here in right side panel, right click to create a new DWORD value with the name NoSaveSettings (it is case sensitive), then assign number 1 in value data box.


Now close the registry editor and restart your computer after any changes to go into effect.
But next time, if you want to enable right click functionality on desktop then simply change the value to 0 of data box or delete the NoSaveSettings DWORD item.


Disable the right click functionality on the desktop

To use this feature, you will need to be logged into your computer with administrative rights.

Click Start button and type regedit in Run option then press Enter for next.


Here locate the location to:

HKEY_CURRENT_USER\Software\Microsoft\Windows\CurrentVersion\Policies\Explorer


Here in right side panel, right click to create a new DWORD value with the name NoViewContextMenu (it is case sensitive), then assign number 1 in value data box.


Now close the registry editor and restart your computer after any changes to go into effect.
But next time, if you want to enable right click functionality on desktop then simply change the value of data box or delete the NoViewContextMenu DWORD item.


Changing the Title on Windows Media Player

You can change the title bar for the Windows Media Player

1. Start Regedit

2. Go to HKEY_USERS \ .DEFAULT \ Software \ Policies \ Microsoft \ WindowsMediaPlayer

3. Create a string value of TitleBar

4. Give it a value of whatever you want to appear in the title bar


Hide File In Image

make a Zip or Rar of the File you need to hide
then palce both the image and zipped file in same folder

Open command prompt( Start -> Run -> Cmd ) browse to your folder (say cd c:\new)

type copy /b fun.jpg + secret.rar funs.jpg

As far as anyone viewing is concerned, this file looks like a JPEG, acts like a JPEG, and is a JPEG, yet it now contains your file.

In order to view/extract your file, there are two options that you can take

a) Change the file extension from fluffy.jpg to fluffy.rar, then open and your file is there
b) Leave the file extension as is, right click, open with WinRar and your file is there


Changing the Location of Windows' Installation Files

If you need to change the drive and or path where Windows looks for its installation files:


1.Open RegEdit

2.Go to
HKEY_LOCAL_MACHINE\SOFTWARE\ Microsoft\ Windows\ CurrentVersion\ Setup

3.Edit the value next to SourcePath


Hide Your HDD Partitions

Hide your HDD partitions
1. Go to Start > run > type “diskpart”.
a dos window will appear with following like that
DISKPART>

2. Then type “list volume” without quote
It will look like this.

Volume### Ltr Label Fs Type Size Status Info
————– —- —— — —– —- ——- —–

Volume 0 F CD-ROM
Volume 1 C NTFS Partition 7000MB Healthy
Volume 2 D soft NTFS Partition 8000MB Healthy
Volume 3 E —- NTFS Partition 8000MB Healthy

3. If u want to hide drive E then type “select volume 3″ without quote

then a message will appear in same winwods { Volume 3 is the selected volume}

4.now type ” remove letter E” without quote
now a message will come { Diskpart Removed the Drive letter }
sometime it requires the reboot the computer .

Diskpart will remove the letter .Windows XP is not having capabilty to identify the unkown volume.

Don’t afraid ur Data will ramin same .
to Come back the Drive repeat the process . but in 4th step which is shown in this post replace ” remove” to “assign”
means type ” assign letter E” without quote
The above method won’t work for the drive containing Operating System
and it can also be done using System Manager>Storage Manager


Speedup Folder Browsing

You may have noticed that everytime you open my computer to browse folders that there is a slight delay. This is because Windows XP automatically searches for network files and printers everytime you open Windows Explorer. To fix this and to increase browsing significantly:

1. Open My Computer
2. Click on Tools menu
3. Click on Folder Options
4. Click on the View tab.
5. Uncheck the Automatically search for network folders and printers check box
6. Click Apply
7. Click Ok
8. Reboot your computer


How to remove RAVMON Virus from your PC ? Show hidden files and folders not working ? Computer shuts down automatically ?

Is your right click context menu showing some Chinese scripts ? Is your show hidden files and folders not working ? Is your command prompt , Registry Editor and task manager disabled ??

If all these things are happening to your Computer , the reason is that it has got infected by a virus named " RAVMON " .What can this Virus do ??

* Disables task manager , Registry Editor and Command prompt .
* Right click menu shows some Chinese scripts as shown in the figure.
* Computer shutdown automatically and slogs a lot.
* Folder Options disappear
* Show hidden files and folders Option won't work.

With all these things not working , I can understand what can go with you !! I saw this thing on my friends PC . Then only I decided to write the solution for this.So how are you going to remove this ?

Download it and remove the Virus.

Download the RAVMON virus removal Tool
Note : Wait for the page to load and then click start download

One you download the tool , you can see the menu as shown in the figure.Click on the three of them.and press OK.If you are not infected with RAVMON then the tool automatically shows the error message.So download it and enjoy using your PC.


Make Mp3 Files Smaller Without Losing Quality

(Download one from musicmatch.com. The "Plus" version has more features and burns CDs faster, but the free version works just fine for converting files)


1. Install music match box and then restart your computer if it asks
2. open music matchbox and click file convert files
3. in the bottom right hand corner called 'destination type' change it to mp3 pro.
4.you can edit the bitrate but the higher the bitrate the bigger the size
5. choose the songs you want to convert and click start

**if you want to try something different repeat step one and 2 and instead of making the destintion type mp3 pro make it 'mp3pro vbr'

again the lower the setting the smaller the size


Monday, November 3, 2008

Multiple okut in firefox

Login with multiple ids at the same time in orkut , gmail , yahoo


Step 1:
open system properties(by right clicking my computer), choose tab advanced, click to environment variables button. in system variables section, click new. type this information to each textbox.

variable name: moz_no_remote(should be all small letter)

variable value: 1

press ok to close all windows.

step 2:
open firefox icon's properties(from desktop and quick launch). add extension -p to command line(like "c:\program files\mozilla firefox\firefox.exe" -p). press ok.

while starting firefox u have to create two separate profiles of firefox so that u can login to two accounts of any(orkut,yahoo,rediff or anything else).......
for three logins create three profiles of firefox.........


Disable autocomplete in Internet Explorer

You may want to disable autocomplete in Internet Explorer for security reasons. Maybe you have noticed that Internet Explorer stores your previous entries in the web address bar, or in web forms where you enter personal information or user names to log on.

If you share your computer with other people and you don't want them to see your previous entries, you can simply disable autocomplete in IE.

* In Internet Explorer, click on the Tools menu and select Internet Options
* Select the Content tab
* Under "Personal Information", click on the "AutoComplete" button


Internet Explorer offers different levels of privacy :

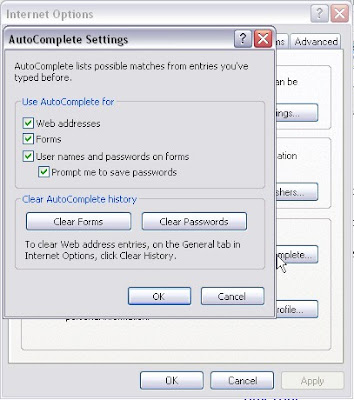
The web addresses check box specifies if you want Internet Explorer to automatically list previously entered internet addresses as you type them in the address bar. Deselect this check box if you don't want IE to list these entries.

The forms check box specifies if you want IE to list entries you've used before when filling in your name and address information in a web form. Deselect the check box to disable this option.

The user names and passwords check box makes IE automatically fill in the username and password information when you are visiting web pages that you have visited before.

Click the "Clear forms" and "Clear passwords" buttons to remove the information that Internet Explorer had previously stored for you.

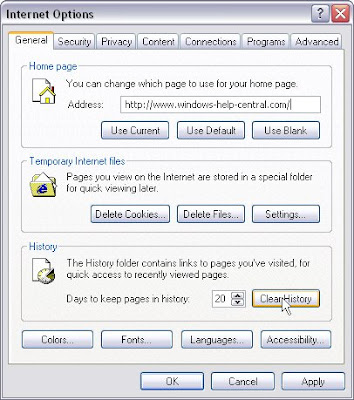
The text below these buttons indicate that you cannot remove stored web address entries from this dialog. Instead, click the ok button in this "Autocomplete Settings" dialog, then click the "General" tab and click the "Clear History" button. This clears the entire history, you cannot clear individual entries from the history list.


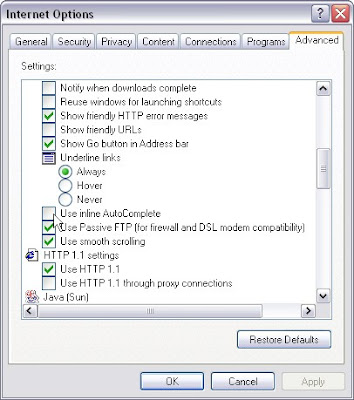
If you want to completely disable autocomplete, click the "Advanced" tab in the Internet Options dialog, scroll down to "Use Inline Autocomplete" and deselect the check box.


Make Use Of Your Windows Key

The Windows logo key, located in the bottom row of most computer keyboards is a little-used treasure. Don't' ignore it. It is the shortcut anchor for the following commands:

Windows: Display the Start menu
Windows + D: Minimize or restore all windows
Windows + E: Display Windows Explorer
Windows + F: Display Search for files
Windows + Ctrl + F: Display Search for computer
Windows + F1: Display Help and Support Center
Windows + R: Display Run dialog box
Windows + break: Display System Properties dialog box
Windows + shift + M: Undo minimize all windows
Windows + L: Lock the workstation
Windows + U: Open Utility Manager
Windows + Q: Quick switching of users (Powertoys only)
Windows + Q: Hold Windows Key, then tap Q to scroll thru the different users on your PC


Get The Drivers You Need

- Visit Windows Update (XP Only)
- Look at the left hand pane and under Other Options click Personalize Windows Update.
- Now in the right hand pane check the box - Display the link to the Windows Update Catalog under See Also
- Below Choose which categories and updates to display on Windows Update - make sure you check all the boxes you want shown.
- Click Save Settings
- Now look in the left hand pane under See Also click Windows Update Catalog and choose what you're looking for. Choose either MS updates or drivers for hardware devices.
- Start the Wizard and off you go.

There are a TON of drivers there. I highly recommend you take a look at this page prior to downloading something from the web.

Save Your New Downloads

Since some people are still using modems and since MS is issuing patches right and left for XP wouldn't it be nice if after you downloaded all the updates you could save them? Well, you can and MS has provided a way for you to do it.
Here's How:
- Logon to Windows Update
- Choose Windows Update Catalogue (left hand pane)
- Choose Find updates for Microsoft Windows operating systems (right hand pane)
- Choose your version and language then Search
- Choose one the following:
- Critical Updates and Service Packs
- Service Packs and Recommended Downloads
- Multi-Language Features (0)
- Once chosen simply click on what you want to download and then back at the top click Review Download Basket
- You are taken to the next page where at the top you can specify where the downloads are to be saved.
- Click Download now.

Each patch will make a directory under the root of the folder you saved them to. Once finished you need to go to where you saved the file (s) to and then simply install all your patches.
Read-me's are available in each patch section so you know which one you are installing.


Speed Up Browsing

When you connect to a web site your computer sends information back and forth. Some of this information deals with resolving the site name to an IP address, the stuff that TCP/IP really deals with, not words. This is DNS information and is used so that you will not need to ask for the site location each and every time you visit the site. Although Windows XP and Windows XP have a pretty efficient DNS cache, you can increase its overall performance by increasing its size. You can do this with the registry entries below:

Windows Registry Editor Version 5.00
[HKEY_LOCAL_MACHINE\SYSTEM\CurrentControlSet\Services\Dnscache\Parameters]
"CacheHashTableBucketSize"=dword:00000001
"CacheHashTableSize"=dword:00000180
"MaxCacheEntryTtlLimit"=dword:0000fa00
"MaxSOACacheEntryTtlLimit"=dword:0000012d

Make a new text file and rename it to dnscache.reg. Then copy and paste the above into it and save it. Merge it into the registry.


Disable Attachment restrictions in Outlook from Office

[HKEY_CURRENT_USER > Software > Microsoft > Office > 10.0 >Outlook > Security]

"Level1Remove" = "exe;bat;vbs"


"STOP” ERROR MESSAGES AT SHUTDOWN

Some users have gotten an error message similar to the following when attempting either to shutdown or restart Win XP:

STOP 0000009F, DRIVER_POWER_STATE_FAILURE
STOP 0x0000001E: KMODE_EXCEPTION_NOT_HANDLED
STOP 0x000000D1: DRIVER_IRQL_NOT_LESS_OR_EQUAL

TechNet and the Microsoft Knowledge Base have numerous articles discussing this type of error condition; for example, these. As a review of these articles will show, these are commonly device driver problems, but may also be caused by troublesome software (such as the notorious CrashGuard), or a problem in a system service. MSKB article Q262575 discusses a shutdown problem of this type, known to exist in Windows 2000 due to a resource (IRQ) conflict, if you have PACE Interlok anti-piracy software installed. This problem may occur in Windows XP as well.
Microsoft advises the following as one approach to these problems: Restart the computer. Press F8 during the restart and select “Last Known Good Configuration.” If you catch the problem when it first occurs (meaning you likely have installed only one or two drivers or new service), this will return you to a previous working condition. (Would System Restore accomplish the same thing? I don’t know, and don’t have a broken system to test it on.)

Microsoft reported similarly that these STOP code error message occur when Windows XP is trying to shut down devices. He says that he has seen this twice: once with Logitech Quickcam installed (with an unsupported driver), and once with a USB DSL modem that would hang if it wasn’t disconnected before shutdown.

SHUTDOWN WORKS, BUT IT’S REAL SLOW.

If it appears that Win XP is not shutting down, give it some time. Some users have reported a minute or longer for shutdown to visibly start. Thus far, it appears that this is a consequence of software that is running when shutdown is attempted, and it also may have something to do with particular hardware. If you are experiencing this problem, be sure to close all running programs before attempting shutdown and see if this solves your problem. If so, then you can determine, by trial and error, which program(s) are involved.
One specific solution for this was provided by Microsoft support. ” In Control Panel | Administrative Tools | Services. (You can also get this by launching SERVICES.MSC from a Run box. This utility is also built into the Computer Management console.) Stop the Nvidia Driver Helper service. Many other friends quickly confirmed that this solved this “extremely slow shutdown” problem for them.

POWERDOWN ISSUES.

“Powerdown issues” are quite distinctive from “shutdown issues.” I define a shutdown problem as one wherein Windows doesn’t make it at least to the “OK to shut off your computer” screen. If Windows gets that far, or farther, then it has shut down correctly. However, the computer may not powerdown correctly after that. This is a different problem, and I encourage that people reporting these issues to make a very clear distinction in their labeling.

When Windows XP won’t powerdown automatically, the APM/NT Legacy Power Node may not be enabled. To enable this, right-click on the My Computer icon, click Properties | Hardware | Device Manager | View. Check the box labeled “Show Hidden Devices.” If it’s available on your computer, there will be a red X on the APM/NT Legacy Node. Try enabling it and see if this resolves the powerdown problem.

This should resolve the powerdown issue in most cases. However, other factors can sometimes interfere with correct powerdown functioning. In that case, consider the following tips:
· If you are changing the default power settings in the BIOS, it can lead to a powerdown problem. Restoring all BIOS power settings to default will likely fix it.

OTHER KNOWN ISSUES & HINTS.

· BIOS UPGRADE.
As with every new operating system that comes along - especially one that is as much of a “step up” as Windows XP is from Windows 9x - the recommendation is made to be sure your BIOS is updated. Many people have reported that this has solved their shutdown problems (and had other advantages) with Win XP, just as it has in earlier versions of Windows.


Setup XP from a Network drive

You use three switches. If D: is the target, and G: is the net drive.

G:i386winnt32 /tempdrive:D /makelocalsource /s:G:i386


Use the Internet Connection Firewall to Secure Your Small Network

A firewall is a security system that acts as a protective boundary between a network and the outside world. Windows XP includes Internet Connection Firewall (ICF) software you can use to restrict what information is communicated between the Internet and your home or small office network. ICF also protects a single computer connected to the Internet with a cable modem, a DSL modem, or a dial–up modem.

If your network uses Internet Connection Sharing (ICS) to provide Internet access to multiple computers, you should use ICF on the shared Internet connection. However, ICS and ICF can be enabled separately. You should not enable the firewall on any connection that does not directly connect to the Internet, and ICF is not needed if your network already has a firewall or proxy server.

You must be logged on to your computer with an owner account in order to complete this procedure. You should not enable Internet Connection Firewall on virtual private networking (VPN) connections or on client computers because ICF will interfere with file and printer sharing. ICF cannot be enabled on the private connections of the Internet Connection Sharing host computer.


To enable or disable Internet Connection Firewall

Open Network Connections (Click Start, click Control Panel, and then double–click Network Connections.)

Click the Dial–up, LAN or High–Speed Internet connection that you want to protect, and then, under Network Tasks, click Change settings of this connection.

On the Advanced tab, under Internet Connection Firewall, select one of the following:

To enable Internet Connection Firewall (ICF), select the Protect my computer and network by limiting or preventing access to this computer from the Internet check box.

To disable Internet Connection Firewall, clear the Protect my computer and network by limiting or preventing access to this computer from the Internet check box. This disables the firewall, your computer and network are then vulnerable to intrusions


Remove shortcut arrow from desktop icons

Here's how you can remove those shortcut arrows from your desktop icons in Windows XP.

1. Start regedit.
2. Navigate to HKEY_CLASSES_ROOTlnkfile
3. Delete the IsShortcut registry value.

You may need to restart Windows XP.


WinXP Clear Page file on shutdown

Go to Control panel Administrative tools, local security policy. then goto local policies ---> security options.
Then change the option for "Shutdown: Clear Virtual Memory Pagefile"


Reduce Temporary Internet F ile Space

he temporary internet files clutter your hard drive with copies of each page visited. These can build up over time and take up disk space. Even more bothersome is that instead of getting new pages each time IE often takes the page out the temp internet files. This can be a problem if you are viewing a website that is updated all the time. If you are on a slow connection such as a 56K or lower then this can be good but if you are on a fast broadband connection, like me, then you can get away with decreasing the size of your temp internet files to just one meg without any performance decrease.

Launch Internet Explorer.
Select the Tools from the menu bar.
Then select Internet Options... from the drop down menu.
Once the internet options has loaded click on the general tab.
Under the temporary internet files section click the settings button.
A settings window will load. Slide the slider all the way to the left so the size indicated in the text box on the right is one.
Click OK
Click Ok


Customize Internet title bar

In regedit navigate to this key:

HKEY_CURRENT_USERSoftwareMicrosoftInternet ExplorerMain

change the value of the string "Window Title" to whatever you want on the title bar of Internet Explorer - to have no title except the title of the web pages you are browsing do not enter anything for a value.


Rename a Series of Files

When you download photos from your digital camera, they often have unrecognizable names. You can rename several similar files at once with the following procedure. This also works for renaming other types of files.

1.Open the My Pictures folder. (Click Start, and then click My Pictures.) Or open another folder containing files that you want to rename.
2.Select the files you want to rename. If the files you want are not adjacent in the file list, press and hold CTRL, and then click each item to select it.
3.On the File menu, click Rename.
4.Type the new name, and then press ENTER.


All of the files in the series will be named in sequence using the new name you type. For example, if you type Birthday, the first will be named Birthday and subsequent files in the series will be named Birthday (1), Birthday (2), and so on. To specify the starting number for the series, type the starting number in parentheses after the new file name. The files in the series will be numbered in sequence starting with the number you type. For example, if you type Birthday (10), the other files will be named Birthday (11), Birthday (12), and so on.


For a Safer, faster XP Close Unwanted Services

To disable unneeded startup services for a safer, faster XP, use the "Services" Admin Tool (Control Panel > Administrative Tools > Services). If you are a single user of a non-networked machine, you can disable the following items, with no ill effect.

Alerter
Clipbook
Computer Browser
Fast User Switching
Human Interface Access Devices
Indexing Service (Slows the hard drive down)
Messenger
Net Logon (unnecessary unless networked on a Domain)
Netmeeting Remote Desktop Sharing (disabled for extra security)
Remote Desktop Help Session Manager (disabled for extra security)
Remote Procedure Call Locator
Remote Registry (disabled for extra security)
Routing & Remote Access (disabled for extra security)
Server
SSDP Discovery Service (this is for the utterly pointless "Universal P'n'P", & leaves TCP Port 5000 wide open)
TCP/IP NetBIOS Helper
Telnet (disabled for extra security)
Universal Plug and Play Device Host
Upload Manager
Windows Time
Wireless Zero Configuration (for wireless networks)
Workstation


Save the Windows Updates to your Drive

If you want to save your files to your hard drive, so after a format you dont have to download them all again, here's How:

- Logon to Windows Update

- Choose Windows Update Catalogue (left hand pane)

- Choose Find updates for Microsoft Windows operating systems (right hand pane)

- Choose your version and language then Search

- Choose one the following:

- Critical Updates and Service Packs
- Service Packs and Recommended Downloads
- Multi-Language Features (0)


- Once chosen simply click on what you want to download and then back at the top click Review Download Basket

- You are taken to the next page where at the top you can specify where the downloads are to be saved.

- Click Download now. Each patch will make a directory under the root of the folder you saved them to.
Once finished you need to go to where you saved the file (s) to and then simply install all your patches.